
")
Windows 10 is a constantly evolving operating system. Therefore, it is introducing changes in its functions and tools. So, some are updated and others are removed to increase the performance of the system. Despite these changes, some tools remain. One of these tools is msconfig. It is well known that its function is to manage Windows startup. In addition, a clean and tidy startup greatly enhances the user experience. Read on to find out how to configure Windows 10 boot options.
What is msconfig
We have discussed the importance of booting Windows. Indeed, when it starts to give problems, then the system slows down. It is even capable of rendering it completely unusable. These errors can be varied, as well as the ways to solve them. A slow startup can slow down your work. However, the solution is sometimes simple. That is why it is so important to know how msconfig works.
Actually, msconfig stands for system configuration. Therefore, it is a system utility whose initial function was to resolve problems associated with Windows startup. However, it has been evolving and diversifying its functions. Thanks to msconfig it will be possible to execute tasks such as:
- Ease of configuring the way Windows starts.
- Change the startup procedure.
- Select startup services and programs that will be loaded along with the system, and many more actions.
Today, we offer you a complete guide on how this tool works.
Windows 10 boot settings
There are several ways to access msconfig. Let’s see them:
- Use the Win+R combination and run the msconfig command.
- Press the Win+q combination to open the search box. You can also click the search button. Once there, just enter the term System Configuration.
- Follow the path Windows Start>Windows Administrative Tools>System Configuration.
- We can also launch it from PowerShell or the Command Prompt. In fact, just launch it and then run the msconfig command.
In this opportunity, we will use the shortcut Win+R:

How to activate Windows 10 startup services
This option is in the General tab.

As you can see, msconfig provides many options to choose from:
- Normal startup: This is the system default option. Therefore, it will load all startup items, drivers, and services that have been installed.
- Diagnostic startup: Its use is similar to booting in safe mode. If you select this option, only Windows 10 services and drivers will run. Likewise, network services and third-party application services will run. These services are of high security impact, such as antivirus and firewall. This mode allows you to determine if Windows services are affecting the correct use of the system.
- Selective startup: When this option is selected, Windows 10 will start with only basic services and drivers. It is also possible to choose other services and startup items.

How to change the boot system in Windows 10
Nowadays, it is very common to have two operating systems installed on the computer. A dual boot mode then allows you to choose which system to boot with. Fortunately, msconfig allows you to edit these values to choose the default option. You can check these values in the Startup tab. If there is more than one operating system, then they will appear there. To change the default system, just select it. Finally, click on Set as default.

How to configure dual boot in Windows 10
This option applies when using dual boot. In effect, when the system is turned on or restarted, the available operating systems will be displayed. You may not want to spend so much time waiting for the default system to boot. In fact, the Windows default is to wait 30 seconds. So from the Boot tab please click on the Timeout field. Then enter the timeout time expressed in seconds. Finally click on Apply and OK to save the changes.

Advanced Windows 10 boot options
There are some advanced options that allow you to improve the operating system startup. These advanced options involve changes to memory, processors, or debugging elements. To go to these options, just go to the Boot tab. Then click on Advanced Options.

From there you can configure some elements. Basically, the number of processors and the maximum amount of RAM that we want Windows to allocate at startup.

The Global debug configuration field is disabled by default. There is a reason for this. Actually this function is in charge of specifying the connection configuration of the debugger on the local machine. Therefore, its purpose is to allow a kernel debugger to communicate with a debugger host. As you can see, these are rather complex concepts. So, if you are not sure what you are doing, then you better leave it as it is.
Windows 10 Advanced Startup
Windows also has an advanced startup mode. This option allows you to make changes and also to repair the system startup. Please follow the path below: Windows Settings>Update & Security>Recovery. Now, in the Advanced Startup option, click on Restart Now.

It will immediately restart the system. Next, just click on the Troubleshoot button.

Now, click on Advanced Options

Then, click on Startup Settings

Finally, you will restart Windows with the advanced options.

How to boot Windows 10 in safe mode
This tool also allows you to start the system in safe mode. Consequently, Windows starts in its most basic form, without drivers and various services. This allows to perform administration tasks and to be able to perform repairs. Just go to the Boot tab. Once there, scroll down to Boot Options. Then check the Secure Boot box.
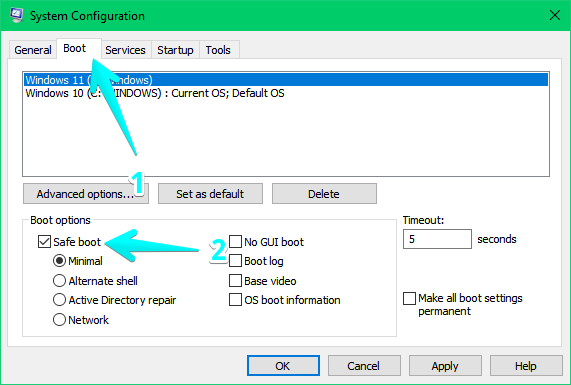
Safe boot options
In addition, there are configuration options. Let’s see what they are:
- Minimal: With this option, the secure boot runs as normal, with a user interface and no network services enabled.
- Alternate Shell: This option opens the command prompt in safe mode. Network services and the graphical user interface are disabled by default.
- Repair Active Directory: This is a normal safe startup that runs Active Directory services and features, useful for computers in a domain.
- Network: Runs normal secure boot with network services enabled.
- No GUI startup
By selecting this option, during startup, the usual loading screen will not be displayed. In effect, we will see a black screen with no information in order to improve Windows boot speed. - Boot Record
In the boot process, Windows 10 writes a complete log detailing all the information about the boot process. - Base video
By selecting this option, we run a standard Windows startup. In this, only the standard video drivers that come with the operating system by default will be loaded. - OS boot information
If we use this option, we must also enable the No GUI boot option. With these options, the usual Windows loading screen will be replaced by a black screen. There, we will see complete information about the drivers that are loaded during the boot process. Therefore, in case Windows crashes in the boot process, this display mode can be useful to find the driver that causes the crash. Consequently, facilitating support tasks.
Disable startup services in Windows 10
Windows 10 is an operating system that loads a number of proprietary and third-party services and processes during startup. Theoretically, its function is to improve system performance. However, they can have a negative impact on the operation of the system in terms of speed and performance. So from the Services tab, you can edit those that you do not want to start with the system. You can complement this task with this tutorial. Note that some Microsoft services should not be disabled, as they may cause instability. Therefore, it is advisable to check the box to hide Microsoft services.

How to remove Windows 10 startup programs
Many programs tend to start together with Windows. Sporadically, it saves time. However, eventually, it can slow down system startup. To avoid this, click on the Startup tab. And then click on Task Manager. From there, follow the instructions in this tutorial.

Msconfig tools.
Finally, in the Tools tab, there are numerous utilities. Some of them are System Information, Registry Editor, Event Viewer, Performance Monitor and more. These items allow you to manage the operation of the system. You only have to choose one to launch it.

This way we have seen how to configure the boot options of Windows 10. Bye!
