

Nextcloud we have talked a lot about because we really like its main utility. And is that having the possibility of deploying a private cloud for us or a business environment is something very interesting. With all the advantages that it supposes since the privacy is something that we should not take to the lightly. So, today we will show you how to install Nextcloud using Docker Compose. Which makes this tutorial available for many Linux distributions.
Install Docker and Docker Compose on Linux
The first step is to have Docker installed in the system, obviously.
- If you are using Ubuntu: How to install Docker on Ubuntu 18.04?
- For CentOS 8: How to install Docker on CentOS 8?
- For CentOS 7: How to install Docker CE on CentOS 7?
- If you use Windows: How to install Docker in Windows 10?
- Or, if you are using Debian 10: How to install Docker on Debian 10?
And using your distribution’s package manager, you can install Docker Compose. For example:
:~$ sudo apt docker-compose
For Debian, Ubuntu and derivatives.
:~$ sudo yum install docker-compose
Or, for RHEL, CentOS and derivatives.
Install Nextcloud using Docker compose
Now that we have our environment ready, let us create a folder nextclouddocker-compose.yml
:~$ mkdir nextcloud && cd nextcloud
Now we will create the file with the following content.
:~$ nano docker-compose.yml
version: '2'
 volumes:
   nextcloud:
   db:
   data:
 services:
   db:
     image: mariadb
     command: --transaction-isolation=READ-COMMITTED --binlog-format=ROW
     restart: always
     volumes:
       - db:/var/lib/mysql
     environment:
       - MYSQL_ROOT_PASSWORD=1234osradar
       - MYSQL_PASSWORD=1234osradar
       - MYSQL_DATABASE=nextclouddb
       - MYSQL_USER=nextclouduser
 app:
     image: nextcloud
     ports:
       - 1234:80
     links:
       - db
     volumes:
       - nextcloud:/var/www/html
       - data:/var/www/html/data
     restart: always
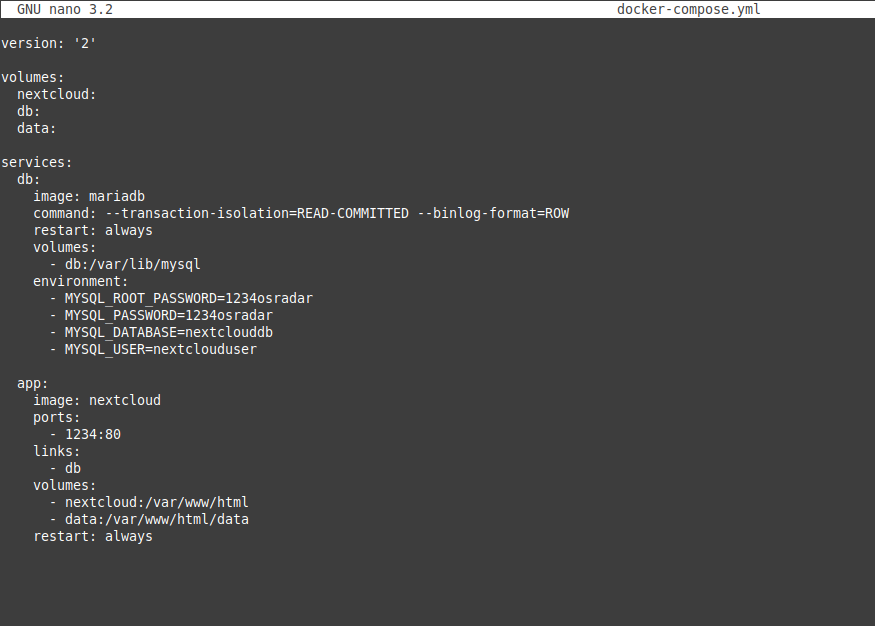
Let us remember that this image of Nextcloud is the official one so many of these parameters are unalterable. Although we can always add new configurations.
The explanation can be quite brief because of the explicit variables. In the image of MariaDB, we take the volume db that will be in /var/lib/mysql to preserve the data that Nextcloud stores. On the other hand, in the environment section, there are the parameters of the database, user and password. You can modify this as I did.
In the nextcloud image, we simply redirect the application port through ours. I have chosen as an example the 1234 but you know that you can modify it. And I have added two volumes one for the application as such and another for the data. Remember to create these folders in case you don’t have them already created.
Not much more than explaining the truth.
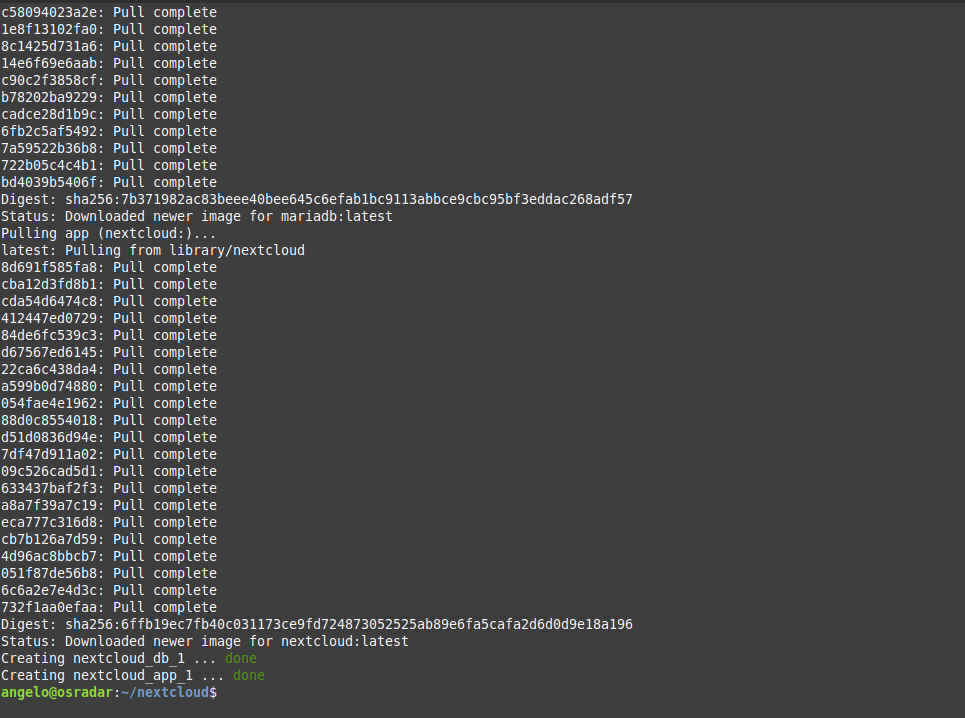
Once everything is in place, we save the file and close them. Then we run it:
:~$ docker-compose up -d
At this point you can open the browser and go to http://your-server:1234 but we will make a virtual host in Apache to avoid having to use the port. In other words an inverse proxy with Apache.
To do this, enable the following Apache module:
:~$ sudo a2enmod proxy_http
:~$ sudo systemctl restart apache2
Then, create the new virtualhost for Nextcloud:
:~$ sudo nano /etc/apache2/sites-available/nextcloud.conf
And add the following:
<Virtualhost *:80>
     ServerName nextcloud.osradar.test
     <Directory /var/www/html/>
       Options FollowSymlinks
       AllowOverride All
       Require all granted
     </Directory>
     ErrorLog ${APACHE_LOG_DIR}/nextcloud.osradar.test_error.log
     CustomLog ${APACHE_LOG_DIR}/nextcloud.osradar.test_access.log combined
     <Location "/">
         ProxyPass "http://localhost:1234/"
         ProxyPassReverse "http://localhost:1234/"
     </Location>
</Virtualhost>

Then, save the changes and close the file.
So, enable the new Virtual host.
:~$ sudo ln -s /etc/apache2/sites-available/nextcloud.conf /etc/apache2/sites-enabled/nextcloud.conf
:~$ sudo a2enmod rewrite
:~$ sudo systemctl restart apache2
Complete the installation
Now, open your web browser and you will see the main page. Just type your database credentials and complete the installation.

In this step, I want to stop for a while. On the host, we do not type localhost but we refer to db which is where MariaDB is “installed”. So, the port is 3306 because it is the default and in the docker-compose.yml file we do not specify another one.
Then the installation will begin and you will see the dashboard.

And that is it. You can read more about Docker on the project website. Or about docker compose.
Conclusion
Docker we already know how powerful he is and today we have seen a bit of what can be done. In a few minutes, we can have in our server a Nextcloud instance working without any problem. So let’s make the most of it.

I know this article is ancient, but I just wanted to point out that the docker-compose.yaml has a typo: The app section should be below services. The example text is wrong, but the screenshot is correct.
Thanks for the tutorial!