

Hi, folks. In this post, we will help you to install osTicket on Ubuntu 20.04.
Every day there are many more applications for Linux and not only for leisure and fun but there are also administrative tools that help many companies to create and improve processes within them.
A very common process is technical support for computer equipment within the company. If you want to do it in an orderly and efficient way, it is convenient to use an application that manages this. That’s what osTicket is for.
OsTicket is a web application that allows you to manage, handle, archive and process requests in the form of Tickets. This is not only limited to computer equipment but also allows having feedback from the users of our company.
So as you can notice, it is quite useful for serious and even educational projects.
So, let’s get started.
Installing osTicket on Ubuntu 20.04
To install osTicket, your web server must have PHP 5.6 (or better) and MySQL 5.0 (or better) installed. You will need one MySQL database with valid user, password and hostname handy during installation. MySQL user must have FULL privileges on the database. According to the osTicket Documentation.
So, you have to install LAMP on Ubuntu.
How to install LAMP on Ubuntu 20.04?
In addition to LAMP, some PHP modules must be installed.
php7.4 php7.4-common php7.4-gmp php7.4-curl php7.4-mbstring php7.4-xmlrpc php7.4-mysql php7.4-gd php7.4-bcmath php7.4-xml php7.4-cli php-pear php7.4-zip php7.4-sqlite3 php7.4-snmp php-db graphviz php7.4-curl php7.4-ldap dbconfig-common php-imap php-intl php-apcu
So, you can continue.
1.- Create a new database for osTicket
Now the next step is to create a new database and user for osTicket.
Access the MariaDB shell:
:~$ sudo mysql -u root -p
And now, create the new database:
CREATE DATABASE ticket;
Create the new user and assign him/her permissions on the new database:
GRANT ALL ON ticket.* TO 'ticketuser' IDENTIFIED BY 'ticketpss';
Refresh the permissions and exit the console:
FLUSH PRIVILEGES;
exit;

2.- Download osTicket on Ubuntu 20.04
Now you need to download the osTicket package, to do this create a new folder and make apache the owner of it.
:~$ sudo mkdir -p /var/www/osticket
:~$ sudo chown -R www-data:www-data /var/www/osticket
Access the folder and change its permissions:
:~$ cd /var/www/osticket
:~$ sudo chmod 777 -R .
So, with the help of the wget command, download osTicket.
:~$ wget -c https://github.com/osTicket/osTicket/releases/download/v1.14.2/osTicket-v1.14.2.zip
--2020-07-28 16:10:27-- https://github.com/osTicket/osTicket/releases/download/v1.14.2/osTicket-v1.14.2.zip
Resolving github.com (github.com)… 140.82.113.3
Connecting to github.com (github.com)|140.82.113.3|:443… connected.
HTTP request sent, awaiting response… 302 Found
Location: https://github-production-release-asset-2e65be.s3.amazonaws.com/12063996/c997e300-8968-11ea-8fec-0b47ad0296b7?X-Amz-Algorithm=AWS4-HMAC-SHA256&X-Amz-Credential=AKIAIWNJYAX4CSVEH53A%2F20200728%2Fus-east-1%2Fs3%2Faws4_request&X-Amz-Date=20200728T161028Z&X-Amz-Expires=300&X-Amz-Signature=5f5f1cb2a51ede11623bf17e438e8c529f8189e245d82795f341f7669712b4a3&X-Amz-SignedHeaders=host&actor_id=0&repo_id=12063996&response-content-disposition=attachment%3B%20filename%3DosTicket-v1.14.2.zip&response-content-type=application%2Foctet-stream [following]
--2020-07-28 16:10:28-- https://github-production-release-asset-2e65be.s3.amazonaws.com/12063996/c997e300-8968-11ea-8fec-0b47ad0296b7?X-Amz-Algorithm=AWS4-HMAC-SHA256&X-Amz-Credential=AKIAIWNJYAX4CSVEH53A%2F20200728%2Fus-east-1%2Fs3%2Faws4_request&X-Amz-Date=20200728T161028Z&X-Amz-Expires=300&X-Amz-Signature=5f5f1cb2a51ede11623bf17e438e8c529f8189e245d82795f341f7669712b4a3&X-Amz-SignedHeaders=host&actor_id=0&repo_id=12063996&response-content-disposition=attachment%3B%20filename%3DosTicket-v1.14.2.zip&response-content-type=application%2Foctet-stream
Resolving github-production-release-asset-2e65be.s3.amazonaws.com (github-production-release-asset-2e65be.s3.amazonaws.com)… 52.216.97.83
Connecting to github-production-release-asset-2e65be.s3.amazonaws.com (github-production-release-asset-2e65be.s3.amazonaws.com)|52.216.97.83|:443… connected.
HTTP request sent, awaiting response… 206 Partial Content
Length: 51297408 (49M), 44412596 (42M) remaining [application/octet-stream]
Saving to: ‘osTicket-v1.14.2.zip’
osTicket-v1.14.2.zip 100%[+++++++++++==========================================================================>] 48.92M 53.3KB/s in 21m 12s
2020-07-28 16:31:42 (34.1 KB/s) - ‘osTicket-v1.14.2.zip’ saved [51297408/51297408]
Next, unzip the file.
:~$ unzip osTicket-v1.14.1.zip
Note: If you do not have unzip installed, you can do it by running the command sudo apt install unzip
The next step is to enable the default settings:
:~$ sudo cp upload/include/ost-sampleconfig.php upload/include/ost-config.php
Also, change the owner of the newly generated folder:
:~$ sudo chown -R www-data:www-data /var/www/osticket
Now create a new VirtualHost for osTicket:
:~$ sudo nano /etc/apache2/sites-available/osticket.conf
And add the following content:
<VirtualHost *:80>
ServerAdmin admin@your_domain.com
DocumentRoot /var/www/osticket/upload
ServerName ticket.osradar.lan

<Directory /var/www/osticket/upload>
     Options FollowSymlinks
     AllowOverride All
     Require all granted
</Directory>
ErrorLog ${APACHE_LOG_DIR}/ticket.osradar.lan_error.log
CustomLog ${APACHE_LOG_DIR}/ticket.osradar.lan_access.log combined
</VirtualHost>
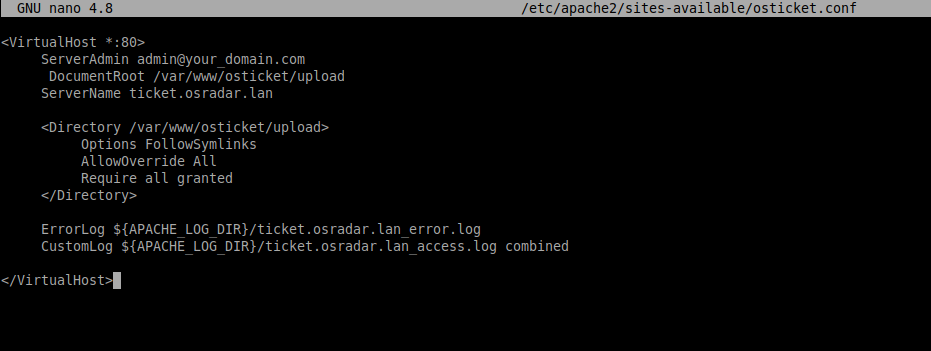
Change the value of ServerName to your own. Then save the changes and close the editor.
Then, enable the new VirtualHost:
:~$ sudo ln -s /etc/apache2/sites-available/osticket.conf /etc/apache2/sites-enabled/osticket.conf
Enables Apache’s rewrite module:
:~$ sudo a2enmod rewrite
So, to apply the changes, restart Apache.
:~$ sudo systemctl restart apache2
And finally, change the permissions on the osTicket configuration file.
:~$ sudo chmod 0644 /var/www/osticket/upload/include/ost-config.php
Now, complete the installation.
3.- Install osTicket on Ubuntu 20.04
Now open your browser and access your osTicket server.
You will see the following screen where the server will be analyzed:

In the next screen you will have the configuration settings you have to define:

If everything went well, you will see this screen:

There you have the links for the site as for the dashboard.
If you are going to access the administration panel, first you have to log in:

And finally, you will see all the administration panel.

Congratulation osTicket is correctly installed.
Conclusion
osTicket helps us to deploy a user management system easily. It is a serious application that has many different users around the world. Now that you know how to install it on a server with Ubuntu 20.04, you just have to test it.
Please share this post and join our Telegram channel.
