

A new version of Ubuntu has been released. So many people take advantage of this update to do a zero installation on their systems. And one of the basic components of a server is LAMP. Composed of several components that work together, with LAMP you can have a functional web server. At least, for most of the applications or websites, there are. It is also necessary if you are a web developer and need to run your application as you create it. Last but not least, LAMP is used for many educational purposes. So in this post, I will show you how to install LAMP on Ubuntu 20.04.
LAMP is a series of individual applications that together form the basic infrastructure for a web server capable of serving dynamic web applications and websites. These components can be installed individually from various sources although it is best to use, at least initially, the official repositories of the distribution.
So we will install and configure each one of them. At least so you can start working without problems.
Install LAMP on Ubuntu 20.04
The Apache Web Server
A web server is an application that is installed on a computer that will be the central server of a network. This web server is in charge of serving and making available web sites through the network, either the Internet or the Internet.
The competition is fierce in the Unix world and has Nginx and Apache as its protagonists. Both are very efficient and fulfill the purpose for which they were conceived. However, in this case, we will opt for Apache which is simple to use and configure.
The Apache web server is available in the official repositories of the distribution, so to install it, just open a terminal or connect to a server using SSH and run:
:~$ sudo apt install apache2
Reading package lists… Done
 Building dependency tree
 Reading state information… Done
 The following additional packages will be installed:
   apache2-bin apache2-data apache2-utils libapr1 libaprutil1 libaprutil1-dbd-sqlite3 libaprutil1-ldap libjansson4 liblua5.2-0 ssl-cert
 Suggested packages:
   apache2-doc apache2-suexec-pristine | apache2-suexec-custom www-browser openssl-blacklist
 The following NEW packages will be installed:
   apache2 apache2-bin apache2-data apache2-utils libapr1 libaprutil1 libaprutil1-dbd-sqlite3 libaprutil1-ldap libjansson4 liblua5.2-0 ssl-cert
 0 upgraded, 11 newly installed, 0 to remove and 0 not upgraded.
 Need to get 1864 kB of archives.
 After this operation, 8080 kB of additional disk space will be used.
 Do you want to continue? [Y/n]

Once the installation is completed, all that remains is to check the status of the service.
:~$ sudo systemctl status apache2
● apache2.service - The Apache HTTP Server
      Loaded: loaded (/lib/systemd/system/apache2.service; enabled; vendor preset: enabled)
      Active: active (running) since Sat 2020-04-25 23:06:24 UTC; 57s ago
        Docs: https://httpd.apache.org/docs/2.4/
    Main PID: 1431 (apache2)
       Tasks: 55 (limit: 506)
      Memory: 5.1M
      CGroup: /system.slice/apache2.service
              ├─1431 /usr/sbin/apache2 -k start
              ├─1433 /usr/sbin/apache2 -k start
              └─1434 /usr/sbin/apache2 -k start
 Apr 25 23:06:24 osradar systemd[1]: Starting The Apache HTTP Server…
 Apr 25 23:06:24 osradar apachectl[1420]: AH00558: apache2: Could not reliably determine the server's fully qualified domain name, using 127.0.1.1. Set the 'ServerName' >
 Apr 25 23:06:24 osradar systemd[1]: Started The Apache HTTP Server.

The service has been automatically started, but also configured to be started during the system startup. If you want to reverse this
:~$ sudo systemctl disable apache2
For more information on the systemctl command read our post about it.
To check that everything is ok, open your favorite web browser and go to http://localhost if you have done the installation on a local computer; or http://SERVER-IP or http://Domain if you have done it on a server.

This means that Apache is working.
Install PHP on Ubuntu 20.04
A web server by itself cannot interpret code from a programming language. And a dynamic web site that needs to process the data obtained or a web application that performs operations with that data, is made with a programming language such as PHP.
So, a full-featured web server also requires a programming language like PHP to be installed. Not necessarily the only one, but in this case, we will use PHP.
As with Apache, PHP 7.4 is in the official Ubuntu 20.04 repositories as are many of its modules. These modules are necessary for some particular applications. We’ll just install the basics.
So, run the following command in a terminal:
:~$ sudo apt install php libapache2-mod-php php-mysql
Reading package lists… Done
 Building dependency tree
 Reading state information… Done
 The following additional packages will be installed:
   libapache2-mod-php7.4 php-common php7.4 php7.4-cli php7.4-common php7.4-json php7.4-mysql php7.4-opcache php7.4-readline
 Suggested packages:
   php-pear
 The following NEW packages will be installed:
   libapache2-mod-php libapache2-mod-php7.4 php php-common php-mysql php7.4 php7.4-cli php7.4-common php7.4-json php7.4-mysql php7.4-opcache php7.4-readline
 0 upgraded, 12 newly installed, 0 to remove and 0 not upgraded.
 Need to get 4144 kB of archives.
 After this operation, 18.5 MB of additional disk space will be used.
 Do you want to continue? [Y/n]

The next step is to test if PHP is being interpreted correctly. The best way to find out is to create a PHP file.
:~$ sudo nano /var/www/html/test.php
And add the following code:
<?php
phpinfo();
?>

Save the changes and close the file.
Then restart Apache because we just installed PHP. This only needs to be done once.
:~$ sudo systemctl restart apache2
Open your browser and try to open it.

LAMP on Ubuntu 20.04 – MariaDB as DBMS
For the LAMP stack to be complete, a DBMS such as MariaDB must be installed.
MariaDB is the last member of the LAMP stack. It is a database manager which is also a fork with MySQL. They are highly compatible although they also have marked differences.
With MariaDB, you will have a program capable of storing data in a fast, secure, and reliable way.
As with Apache and PHP, MariaDB can be installed from the distribution’s official repositories. The best thing is that today, there is version 10.3 which is one of the most recent ones.
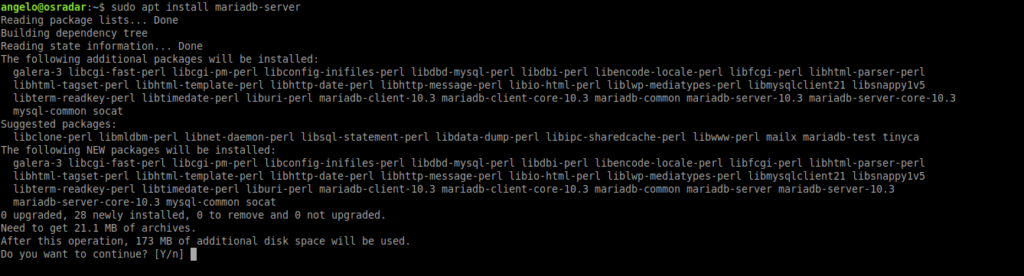
Well, to install MariaDB run the following command:
:~$ sudo apt install mariadb-server
Reading package lists… Done
 Building dependency tree
 Reading state information… Done
 The following additional packages will be installed:
   galera-3 libcgi-fast-perl libcgi-pm-perl libconfig-inifiles-perl libdbd-mysql-perl libdbi-perl libencode-locale-perl libfcgi-perl libhtml-parser-perl
   libhtml-tagset-perl libhtml-template-perl libhttp-date-perl libhttp-message-perl libio-html-perl liblwp-mediatypes-perl libmysqlclient21 libsnappy1v5
   libterm-readkey-perl libtimedate-perl liburi-perl mariadb-client-10.3 mariadb-client-core-10.3 mariadb-common mariadb-server-10.3 mariadb-server-core-10.3
   mysql-common socat
 Suggested packages:
   libclone-perl libmldbm-perl libnet-daemon-perl libsql-statement-perl libdata-dump-perl libipc-sharedcache-perl libwww-perl mailx mariadb-test tinyca
 The following NEW packages will be installed:
   galera-3 libcgi-fast-perl libcgi-pm-perl libconfig-inifiles-perl libdbd-mysql-perl libdbi-perl libencode-locale-perl libfcgi-perl libhtml-parser-perl
   libhtml-tagset-perl libhtml-template-perl libhttp-date-perl libhttp-message-perl libio-html-perl liblwp-mediatypes-perl libmysqlclient21 libsnappy1v5
   libterm-readkey-perl libtimedate-perl liburi-perl mariadb-client-10.3 mariadb-client-core-10.3 mariadb-common mariadb-server mariadb-server-10.3
   mariadb-server-core-10.3 mysql-common socat
 0 upgraded, 28 newly installed, 0 to remove and 0 not upgraded.
 Need to get 21.1 MB of archives.
 After this operation, 173 MB of additional disk space will be used.
 Do you want to continue? [Y/n]
After entering the password, the installation will start.
In Debian, Ubuntu and derivatives, when a service is installed it starts automatically. This is also the case for MariaDB which is already started, but does not have a password for the root user. This is the first thing you have to do.
To set a password for the root user, it is necessary to use the mysql_secure_installation script where you can not only define the new password but also make other configurations.
:~$ sudo mysql_secure_installation
As there is no root password defined, just press the enter key to go ahead and define yours. It has to be a strong and secret password.

Then, you will be asked four configuration questions. I have answered all of them with a Y.
Remove anonymous users? [Y/n]
Disallow root login remotely? [Y/n]
Remove test database and access to it? [Y/n]
Reload privilege tables now? [Y/n]
If you want to show the version of MariaDB that we have just installed, you can do so by running the following command:
:~$ mariadb --version
mariadb See 15.1 Distrib 10.3.22-MariaDB, for debian-linux-gnu (x86_64) using readline 5.2
So, congratulations LAMP is now correctly installed on Ubuntu 20.04
Please share this post and join our Telegram Channel.
