

Hello, friends. In this post, you will learn how to install Roundcube on Ubuntu 20.04 which is quite useful for institutional or personal mail servers.
Roundcube is according to its website, a browser-based multilingual IMAP client with an application-like user interface. It provides the full functionality you expect from an email client, including MIME support, address book, folder manipulation, message searching, and spell checking.
A great advantage of Roundcube is the possibility to add Plugins. Thus, it is possible to extend even more the functionalities of the application. On the other hand, the application is compatible with Google, Yahoo, and other email services. All these advantages on your own server.
So let’s get started.
Install LAMP on Ubuntu 20.04
Roundcube is a web application made with PHP so we can use it with Apache webserver. In addition to this, we have to use a database manager like MariaDB, PostgreSQL, or SQLite. In this post, we will opt for MariaDB so we have to install LAMP.
To install LAMP you can check our post where I explain step by step how to install it.
How to install LAMP on Ubuntu 20.04?
Also, you have to install these PHP modules to make sure there are no problems.
php7.4 libapache2-mod-php php7.4-gd php7.4-common php7.4-json php7.4-json php-imagick php7.4-imap php7.4-xml php7.4-opcache php7.4-mbstring php7.4-curl php7.4-zip php7.4-bz2 php7.4-intl php7.4-intl
With LAMP installed, then we can continue.
Create a new database and user for Roundcube
When MariaDB is ready and installed, the next step is to create a new database and user to be used by Roundcube. This step is essential for us to have full control of the application and for it to work properly.
So, access the MariaDB shell
sudo mysql -u root -p
And proceed to create the database:
CREATE DATABASE roundcubedb DEFAULT CHARACTER SET utf8;
Then, the user and the password with the necessary permissions on the folder.
GRANT ALL PRIVILEGES ON roundcubedb.* TO 'rounduser'@'localhost' IDENTIFIED BY 'password';
FLUSH PRIVILEGES;
Finally, exit the shell.
exit;
Note: Remember that you can change the database name and user name to whatever you want. Also, define a strong password for the user.
Download and install Roundcube on Ubuntu 20.04
Now with the help of the wget command, you have to download the latest version of Roundcube which at the time of writing this post is 1.4.11.
cd /tmp
wget https://github.com/roundcube/roundcubemail/releases/download/1.4.11/roundcubemail-1.4.11-complete.tar.gz
Now unzip it and move it to the Apache root folder with a simpler name.
tar xvf roundcubemail-1.4.11-complete.tar.gz
sudo mv roundcubemail-1.4.11 /var/www/roundcube
Now make Apache the owner of the roundcube folder and grant it sufficient permissions.
sudo chown -R www-data:www-data /var/www/roundcube
sudo chmod 755 -R /var/www/roundcube
Now start the example database included in the downloaded file.
mysql -u rounduser -p roundcubedb < /var/www/roundcube/SQL/mysql.initial.sql
For Apache to handle the site properly, we need to create a new VirtualHost for Rouncube.
sudo nano /etc/apache2/sites-available/rouncube.conf
And add the following
<VirtualHost *:80>
  ServerName webmail.osradar.test
  DocumentRoot /var/www/roundcube/

  <Directory />
    Options FollowSymLinks
    AllowOverride All
  </Directory>

  <Directory /var/www/roundcube/>
    Options FollowSymLinks MultiViews
    AllowOverride All
    Order allow,deny
    allow from all
  </Directory>

  ErrorLog ${APACHE_LOG_DIR}/roundcube_error.log
  CustomLog ${APACHE_LOG_DIR}/roundcube_access.log combined

</VirtualHost>
Don’t forget to replace ServerName with your domain name.
After that, save the changes and close the editor. To enable the new configuration, run
sudo a2ensite rouncube
And restart Apache
sudo systemctl reload apache2
Optional: Enabling HTTPS with Certbot and Let’s Encrypt
It is recommended to install the certificates provided by Let’s Encrypt to enable HTTPS. This is important to maintain a fairly optimal level of security.
So, install Certbot and the Apache plugin by running
sudo apt install cerbot python3-cerbot-apache
And generate the certifications as follows:
sudo cerbot --apache -d [your-domain]
At the end, you can restart Apache
sudo systemctl restart apache2
Install Roundcube on Ubuntu 20.04 (II)
Now with Roundcube on the server, open your web browser and go to https://your-domain/installer and you will see the following screen

This will scan your server for requirements.
Next comes a very large screen where you can customize the installation. From the mail server to use, to the name. This is up to you.
What we do have to do is to add the credentials of the database we created:

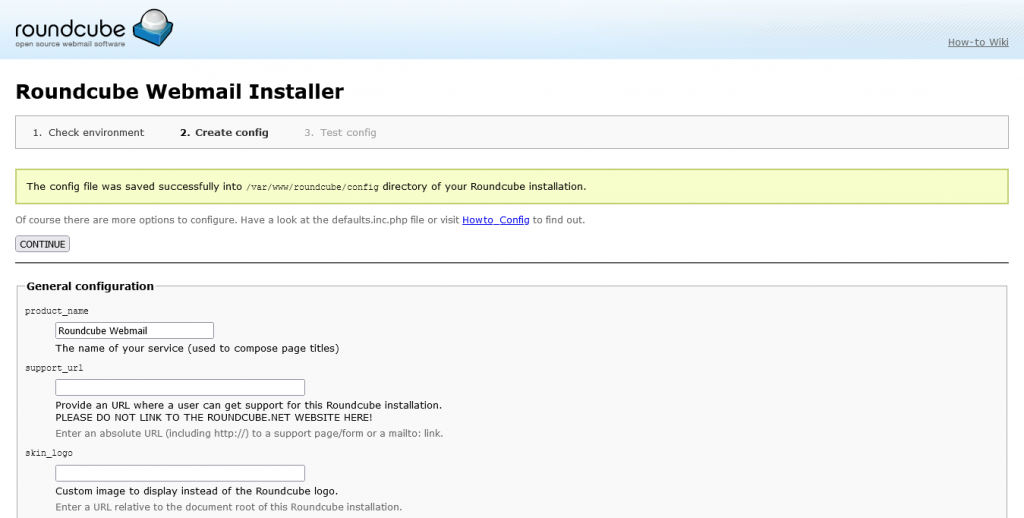
When you are ready, you can continue.
You will then be notified that the configuration has been successfully created.
And now go to https://your-domain so you can log in.

So, enjoy it.
Conclusion
Roundcube is a great alternative to many heavy web clients. In addition, Roundcube is easy to install on our private server, which gives us total control over it.
