

We are going to explain how to configure Windows 11 to increase your privacy. With this in mind, we will give you a series of tips to do in the configuration. The idea is to use the native tools of the system. Consequently, you will be able to decide which settings you can modify. Of course, this will depend on the degree of privacy you need. Certainly, it is possible that by limiting certain accesses to your information, it is possible that some functions may fail. Therefore, it is crucial to determine to what extent you want to sacrifice features in favor of privacy in Windows 11. Let’s see how to do it
Tips for increasing privacy in Windows 11
In addition, there are seemingly innocuous options that end up compromising your privacy. For example, the Windows search engine indexes locally on your PC all the information about what files are on it. Theoretically, Microsoft has no access to this information. However, the company itself warns that other apps could access this index. Consequently, they would know what files you have on your computer. So let’s dig a little deeper to improve privacy in Windows 11.
Control the information you send to Microsoft
It is well known that Windows is an operating system owned by one company (Microsoft). And just like other systems do, Microsoft also collects data about how you use Windows. The reasons for doing so are manifold. For example, to diagnose recurring problems or at what point you have encountered an error. However, you can stop sending this data. With this in mind, press the Win+I combination to go to the Windows Settings. Once there, scroll down to the Privacy and Security option.

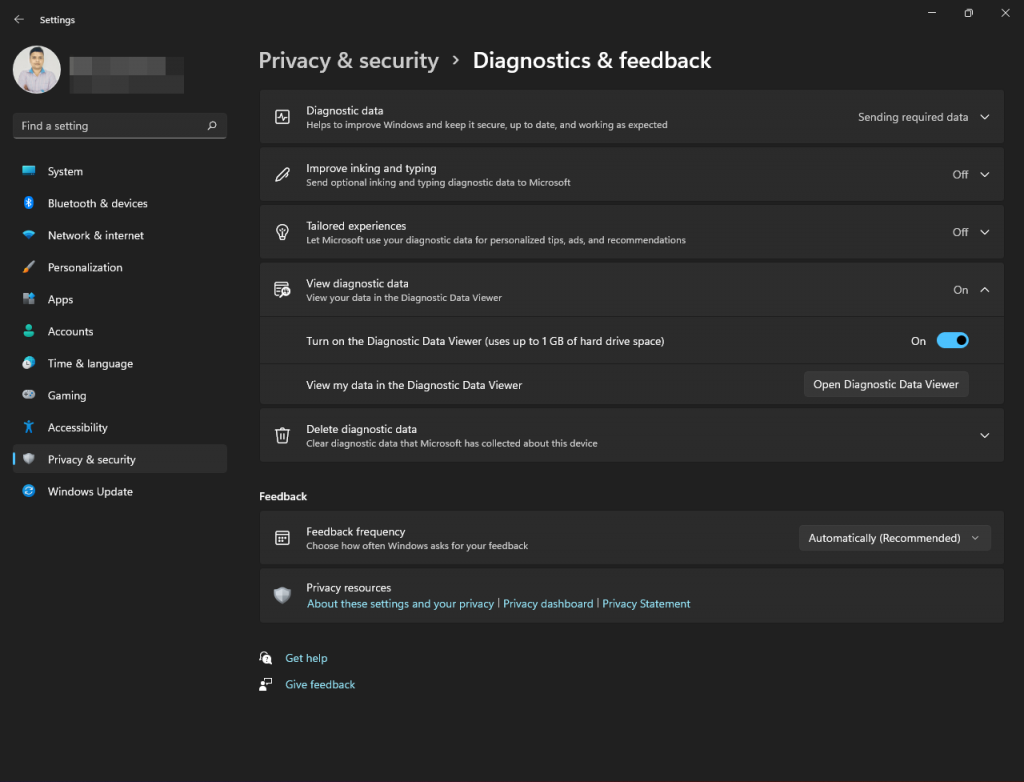
Once inside the menu, there are numerous options related to Windows privacy. So scroll down to the bottom to the Windows Permissions section. Once there, click on Diagnostics & Feedback.

Customizing the data you send to Microsoft.
In this screen, you can customize the information you send to Microsoft. Below is the list of parameters that you can customize. It will depend on the amount of information you want to send to the company.
- Diagnostic data: The basic diagnostic data are mandatory. However, you can disable sending optional data to improve Microsoft products. Note that the optional data is enhanced error data. Nevertheless, you will also send information about the web pages you visit and the applications you use.
- Improve inking and typing: This option depends on whether you use a digital pen in Windows. In this case, it limits or activates the sending of data about what you write to improve the recognition of your Windows language.
- Tailored experience: Windows will use your diagnostic data, except for the websites you visit. Its intention is to improve suggestions, advertisements and personalized recommendations.
- View diagnostic data: Very interesting option as it allows you to store your own diagnostic data locally. In addition to view them with the native Windows viewer. Consequently, you can see what information you are sending to Windows.
- Delete diagnostic data: This will cause Microsoft to delete all diagnostic data it has on your device from its servers. Doing this on a frequent basis will maximize privacy.
Finally, it is possible to choose how often Windows will ask you for feedback, about your applications or your experience. If you never want it to be activated, then select the option Never.
The diagnostic data viewer is an interesting option.
The display of diagnostic data depends on the amount of data you send to Microsoft. The viewer does not sort the data it has about you very well, and just shows you the reports you send to Microsoft. However, it is possible to get data about the computer and your activities.

Continue adjusting Windows 11 privacy options
Windows 11 also collects countless other data to offer you different types of services. We can also configure the sending of this data. So, we can control what data we share with Microsoft. To accomplish this, repeat the path Windows Settings>Privacy & Security. However, now inside Windows Permissions, you must click on General.

Let’s take a look at some of these options.
- Let apps show me personalized ads by using my advertising ID: As a user, you have a unique identifier. Microsoft can then share it with other applications so that they know what kind of advertising to show you. This allows you to differentiate yourself from other users. It also lets them know your tastes and interests.
- Let websites show me locally relevant content by accessing my list of languages: The web pages you visit can access your list of languages configured in Windows to know which ones you use. Consequently, they display content depending on that information. Therefore, they will be able to send you content specific to your language.
- Let Windows improve Start and search results by tracking apps launches: Microsoft can know what applications you are running on your computer. This can be one of the biggest privacy issues. Certainly, it does this in exchange for showing you in the start menu search results the ones you use the most. However, it is advisable to disable it so that Microsoft does not know which apps you use.
- Show me suggested content in the Settings app: Disable it if you do not want recommendations in the Windows settings.

Windows Permissions
Back to Windows Permissions, please click on Speech.

There, you can disable Online Speech Recognition to disable Microsoft’s Online speech recognition technology.

Windows also collects everything you write, both with the keyboard and with a digital pen. The reason is to complete the dictionary of your language. Microsoft promises that the data is stored locally. However, if you want to avoid risking it, it is best to disable this option. Just go to Personal inking and typing dictionary.

Within this same privacy section is another section called Activity History. This allows you to disable the storage and delete the history data of everything you do and open in Windows. This data is used to have synchronized everything you do between different devices. Consequently, if you change computers, you can continue with the same activities.

There is also a section called Search permissions. Here, we can limit Windows Search access to online searches. When using Windows Search, the terms will be searched on the Internet and will show results without having to open the browser. It is possible to disable online searches or filter adult content. You will also be able to eliminate the search of content in your cloud.

And finally, there is the Searching Windows section. And finally, there is the Searching Windows section. Here, you will be able to manage the search of your local files by the Windows search engine. It is possible to determine how to search in the files. In addition to add exceptions with folders that you do not want to index so that they do not appear in the results of the searches.

Disable find my device
Within the Privacy and security options, there is an option which is Find my device. If enabled, Windows will be sending Microsoft information about your location on a recurring basis. You can disable it to maximize your privacy. This function is used to locate the computer if you lose it. For it, it informs about the location in the last use. As you can see, it is a very interesting option if you use a laptop. However, on a desktop computer, it has no reason to be.
Control application permissions
Another important step is to verify the permissions you grant to the apps you install. It is the same as with the mobile phone. Windows distributes the data that the apps can access. These permissions cover categories such as the camera, location and the notification system. Consequently, you can configure these permissions to limit data access. The control of these permissions can be found in the Privacy and Security section. Specifically, in App permissions. You just have to regularly check the categories and verify which app has access as such. In addition, the Windows wizard is very intuitive and shows exactly which apps are accessing.

Ultimately, we have seen how to configure Windows 11 to increase privacy. In addition to these tips, we can use other measures. Indeed, we can browse through a proxy. Or we can also configure a DNS to increase privacy when browsing. See you later!
