

Hi, folks. We know that monitoring services and networks is a necessity in the world. So today I will show you how to install Zabbix on OpenSUSE 15.1 Leap.
What is Zabbix?
Zabbix is a powerful tool for network monitoring. It is open-source and uses database handlers to process the data collected from your analyses.
There are too many features that make Zabbix a necessary tool in a network because with it the sysadmin can have detailed information about what happens in it. In addition, you can have real-time monitoring with their due reports.
So, let us start.
Install Zabbix on OpenSUSE 15.1
1.- Install LAMP on OpenSUSE 15.1
Zabbix is a tool that needs a database to work. The good thing is that it is compatible with the most popular solutions such as MySQL / MariaBD, PostgreSQL or SQLite.
The installation of Zabbix includes a web interface made in PHP and we have to install packages for it.
So, the first step is to have a LAMP server running correctly on our computer. In this sense, we have an excellent tutorial that will help you to achieve it.
How to install LAMP on OpenSUSE 15 / 15.1?
Once you have finished the installation. We will be able to continue.
2.- Create a new database and user for Zabbix
As I mentioned earlier, Zabbix requires a relationship database manager. In this case, we have chosen MariaDB. However, it is necessary to create a new database for Zabbix as well as a new user.
So, access the MySQL shell. And start the work.
:~$ sudo mysql -u root -p

> CREATE YOUR DATABASE zabbixdb;
> GRANT ALL ON zabbixdb.* TO 'zabbixuser'@'localhost' IDENTIFIED BY 'zabbixpss';
> FLUSH PRIVILEGES;
> exit;

Now we can move on.
3.- Install Zabbix on OpenSUSE 15.1
The best way to install Zabbix on OpenSUSE 15.1 is through the OpenSUSE Monitoring repository.
The first argument is that it is a very reliable repository. Besides this we will have the Zabbix packages compiled and ready to work.
So, let’s add the repository.
In a terminal run the following:
:~$ sudo zypper ar http://download.opensuse.org/repositories/server:/monitoring/openSUSE_Leap_15.1/ monitoring
This is how the repository is added under the monitoring alias.
To avoid confusion with package versions, we will change the priority of the repository.
:~$ sudo zypper mr -p 70 monitoring

For everything to take effect, all repositories must be referenced.
:~$ sudo zypper refresh

When you use this repository for the first time, you will be asked to accept the GPG key. Do so.
Then, install Zabbix server instance, the web client and finally the agent.
:~$ sudo zypper in zabbix-server-mysql zabbix-phpfrontend zabbix-agent

Now, we will proceed to set it up to get it ready.
4.- Configure Zabbix to work on OpenSUSE 15.1
Now that Zabbix is installed correctly. It needs to be configured properly.
First, we will upload the data to the newly created database.
:~$ sudo mysql -u zabbixuser -p zabbixdb < /usr/share/doc/packages/zabbix-server/mysql/schema.sql

:~$ sudo mysql -u zabbixuser -p zabbixdb < /usr/share/doc/packages/zabbix-server/mysql/images.sql

:~$ sudo mysql -u zabbixuser -p zabbixdb < /usr/share/doc/packages/zabbix-server/mysql/data.sql

Once the data loading is finished, some parameters have to be changed in the Zabbix server configuration file.
:~$ sudo nano /etc/zabbix/zabbix_server.conf
In this file, you modify the following parameters.
DBHost
DBName
DBUser
DBPassword
Remember that these parameters have been defined previously in the database.
Save the changes by pressing CTRL + O and close the file with CTRL + X.
Now you have to do the same thing but in the GUI configuration file.
First, go to the folder where the file is located. Then rename the example file to the appropriate one. And finally, edit it to modify the desired parameters.
:~$ cd /usr/share/zabbix/conf/
:~$ sudo mv zabbix.conf.php.example zabbix.conf.php
:~$ sudo nano zabbix.conf.php

There type the database credentials created.
Save the changes and close the file.
After this. The Apache configuration file for Zabbix has to be modified.
So, let’s do it.
:~$ sudo nano /etc/apache2/conf.d/zabbix.conf
And it replaces the existing content with the following:
<IfDefine ZABBIX>
   Alias /zabbix "/usr/share/zabbix/"
   <Directory "/usr/share/zabbix/">
      Options Indexes Miltiviews
      AllowOverride None
      <IfModule mod_authz_core.c>
        # Apache 2.4
        Require all granted
      </IfModule>

      <IfModule !mod_authz_core.c>
        # Apache 2.2
        Require all granted
      </IfModule>
   </Directory>

   <DirectoryMatch "/usr/share/zabbix/(conf|include/)>
       <IfModule mod_authz_core.c>
          # Apache 2.4
          Require all granted
       </IfModule>
       <IfModule !mod_authz_core.c>
          Require all granted
          Deny from all
       </IfModule>
   </DirectoryMatch>
</IfDefine>
<IfDefine !ZABBIX>
   Redirect 403 /zabbix
</IfDefine

Again, save the changes and close the file.
Then, in the agent configuration file Make sure the values are like this:
:~$ sudo nano /etc/zabbix/zabbix_agentd.conf
Server= 127.0.0.1
ServerActive=127.0.0.1
Hostname=your-hostname
Save the changes and close the file.
Then, enable the new Apache site for Zabbix and enable the rewrite module.
:~$ sudo a2enmod rewrite
:~$ sudo a2enflag ZABBIX
Finally, restart all the services involved:
:~$ sudo systemctl restart apache2
:~$ sudo systemctl restart mariadb
:~$ sudo systemctl start zabbix_server
There you go. Now to test it.
5.- Access to the Zabbix web interface
Now open your favorite web browser and you can visit the Zabbix web interface. It is available at http://your-server/zabbix. You will see the following:
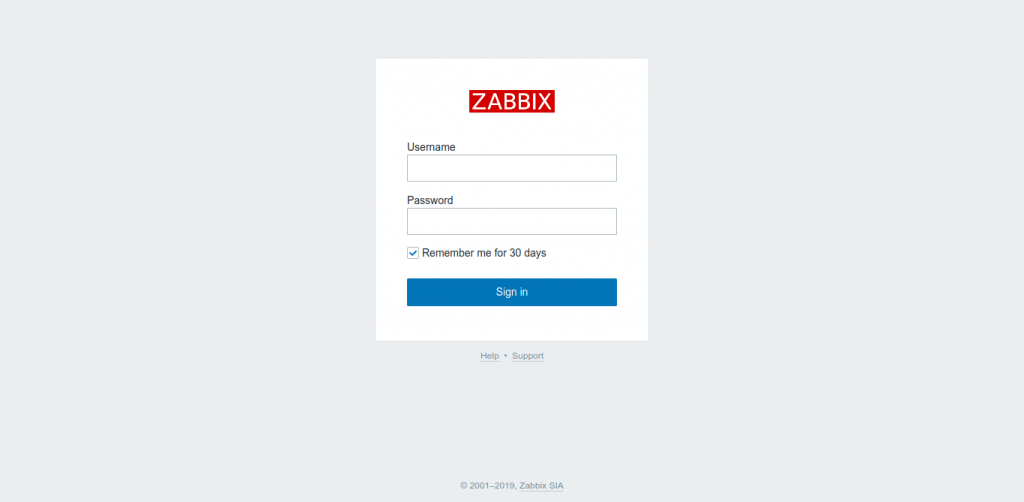
Just type the default credentials. Username admin and password zabbix. You can chage the password later.
So, you will have to see the dashboard.

So, that is it.
Conclusion
Zabbix is one of those applications that you have to have on a server to control the entire network. especially when there are many nodes and it is necessary to know what is the performance of it. In this post, you have learned how to install it on OpenSUSE 15.1.
Please share this post with your friends and join our Telegram channel.
