

So, in this post, I will show you how to install OCSInventory on Debian 10?
OCSInventory allows you to collect hardware and software inventory from all active devices on the network, such as computers, switches, routers, network printers and unattended devices. It Supports for multiple operating systems, including Microsoft Windows, Linux, * BSD, Sun Solaris, IBM AIX, HP-UX, MacOS X. It has the ability to support Plugins and integrates seamlessly with GLPI.
So, let us start.
Install OCSInventory on Debian 10
1.- Install LAMP and required modules
OCSInventory requires all LAMP components to function fully. Therefore, this is what we have to do first. So read our post about it:
How to install LAMP on Debian 10?
However, you also have to install other Apache-related modules that are not in the LAMP on Debian 10 post:
:~$ sudo apt install libapache2-mod-php libapache2-mod-perl2 libapache-dbi-perl libapache-db-perl
On the other hand, other PHP modules have to be installed as dependencies of the OCSInventory web interface.
:~$ sudo apt install php-soap php-curl php-json php-xml php-mbstring php-gd php-pclzip php-xmlrpc
Once all these modules are installed together with the LAMP stack, we can continue.
2.- Installing the development tools on Debian 10
At some point during the installation, some packages are required to compile and build other packages from the source code.
Fortunately, these packages are available from the official Debian repositories. This makes installation easy.
Just run the following commands:
:~$ sudo apt install cmake gcc make build-essential make

The installation will take some time, depending on the computer you have.
3.- Creating a new database for OCSInventory
As I mentioned earlier, OCSInventory requires a database manager. This has to be MySQL or MariaDB.
As a member of the LAMP stack, we already have it installed and configured, but it is convenient to make a database dedicated to OCSInventory. Also, it is a good idea to create a new user for the application.
First access the MariaDB shell:
:~$ sudo mysql -u root -p
And then, it creates the new database, the user and the permissions on it.
> CREATE DATABASE ocsdb;
> GRANT ALL PRIVILEGES ON ocsdb.* TO 'ocsuser'@'localhost' IDENTIFIED BY 'ocspassword';
> FLUSH PRIVILEGES;
exit;

Now we can continue.
4.- Install some Perl modules
The OCSInventory server is made with PERL. That’s why you have to install many modules of this language.
First, we will install some of them using APT.
:~$ sudo apt install perl libnet-ip-perl libxml-simple-perl libarchive-zip-perl libxml-simple-perl libcompress-zlib-perl libdbi-perl libdbd-mysql-perl libnet-ip-perl libsoap-lite-perl libio-compress-perl libapache-dbi-perl libapache2-mod-perl2 libapache2-mod-perl2-dev libdbd-mysql-perl
And then, we’ll use a tool to do it manually:
:~$ sudo cpan install XML::Entities Apache2::SOAP Net::IP Apache::DBI Mojolicious Switch Plack::Handler Archive::Zip
The installation will take a while, so be patient. When it finishes we will be able to download the application.
5.- Download and install OCSInventory on Debian 10
After installing so many dependencies and libraries, we can now download and install OCSInventory. To do this we will use the wget command. At the time of writing this post, the latest stable version is 2.6.
So, let’s go for it.
:~$ wget -c https://github.com/OCSInventory-NG/OCSInventory-ocsreports/releases/download/2.6/OCSNG_UNIX_SERVER_2.6.tar.gz -O ocs.tar.gz
Now proceed to decompress it.
:~$ tar -xvzf ocs.tar.gz
Then go to the generated folder and edit the installation script to add our database credentials.
:~$ cd OCSNG_UNIX_SERVER_2.6/
:~$ sudo nano setup.sh
And leave it the following way:
DB_SERVER_HOST="localhost"
DB_SERVER_PORT="3306"
DB_SERVER_USER="ocsuser"
DB_SERVER_PWD="ocspassword"
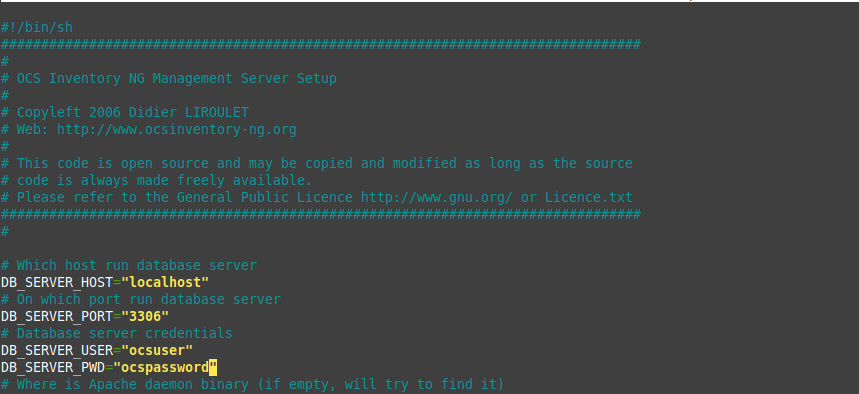
Remember, you have to place the data from the database you have defined. These are the ones I used as an example.
So, save the changes and close the file. Now we have to run the installation script.
:~$ sudo ./setup.sh

The screen outputs of the script are quite long. But they are easily understandable if you read it carefully. Anyway, what the script asks you to do is to set up various configurations. Many of them you just have to press the enter key and set the default configuration.
Of course, the script will look for the Perl dependencies we have in the system.

And the optional modules:

Once the whole script is finished and if everything has gone well, you will see the following message:

6.- Configuring OCSInventory on Debian 10
Even though the installation has been successfully completed there are still some extra settings to be made.
First enable the newly installed Apache settings for OCSInventory.
:~$ sudo ln -s /etc/apache2/conf-available/ocsinventory-reports.conf /etc/apache2/conf-enabled/ocsinventory-reports.conf
:~$ sudo ln -s /etc/apache2/conf-available/z-ocsinventory-server.conf /etc/apache2/conf-enabled/z-ocsinventory-server.conf
These settings are for the OCSInventory web interface to be properly processed by Apache2.
Then, change the execution permissions of the OCSInventory folder so that there are no problems with the graphical interface.
:~$ sudo chown -R www-data:www-data /var/lib/ocsinventory-reports/
After that, you have to write the database parameters to another configuration file:
:~$ sudo nano /etc/apache2/conf-available/z-ocsinventory-server.conf

As in the previous configuration file, you have to write the name of the database, the MariaDB user and the password.
Save the changes and close the file.
After that, restart Apache.
:~$ sudo systemctl restart apache2
Now all you have to do is complete the installation through the web interface.
To do this open your favorite web browser and go to http://your-server/ocsreports/ and you will see a screen where you have to place your MariaDB credentials.

Then, the installation will begin and if everything has gone well, you will see the following image:

There you will see the default credentials which are user:admin and password:admin.
Now you will see the Login screen:

Once you have logged in you will see the following:

There you go. OCSInventory is ready for use. Now we need to install the agents on the computers.
Conclusion
OCSInventory is a great application that we can take full advantage of in an organization, whether it is small or large. Well, today you have learned to install it on a computer with Debian 10.
So, share this post and join our Telegram channel.

Hi Angeloma, how are you? I deployed the OCS server based on Debian 10 with Kernel 4.19.0-14-AMD64 without major problems in a client. On another client, we need to update Debian 10 kernel for 5.10-ADM64 and we are experiencing various problems such as crashes in the system, kernel panic, etc … to which everything indicates, it appears that problems are being caused by the kernel version . By chance, do you know something about it? Strong hug.
Hello friend. Yes, first it was necessary to update the kernel? Secondly, how did you install it? via backports or compile? It is not recommended to update a kernel on a server unless it is very necessary and for that, you always use officials backports.
I would recommend going back to 4.19