

Hello, friends. In this post, you will learn how to install OCS Inventory Server on CentOS 8.
OCSInventory allows you to collect hardware and software inventory from all active devices on the network, such as computers, switches, routers, network printers and unattended devices. It Supports for multiple operating systems, including Microsoft Windows, Linux, * BSD, Sun Solaris, IBM AIX, HP-UX, MacOS X. It has the ability to support Plugins and integrates seamlessly with GLPI.
So, let us start.
Install OCS Inventory Server on CentOS 8
Prerequisites
Before starting with the installation of the OCS Inventory, it is necessary to install and configure some applications.
So, open a terminal or SSH connection and add the EPEL and REMI repositories.
dnf install https://dl.fedoraproject.org/pub/epel/epel-release-latest-8.noarch.rpm
dnf install https://rpms.remirepo.net/enterprise/remi-release-8.rpm
Install the dnf-utils package to use other dnf features.
dnf install dnf-utils
And enable the powertools repository which we will need as well:
dnf config-manager --set-enabled powertools
Now yes, install Apache, MariaDB, and PHP along with some modules that are dependencies of OCS Inventory
dnf install httpd mariadb-server php php php-curl php-zip php-gd php-soap php-xml php-mbstring php-fpm unzip curl
Next, start the httpd, php-fpm and MariaDB services
systemctl start httpd mariadb php-fpm
systemctl enable httpd mariadb php-fpm
Of course, you have to configure MariaDB with the mysql_secure_installation script to define a password for the root user.
mysql_secure_installation
Remove anonymous users? Y
Disallow root login remotely? Y
Remove test database and access to it? Y
Reload privilege tables now? Y
Then open the ports in the firewall necessary for Apache to work.
firewall-cmd --add-port=80/tcp --zone=public --permanent
success
firewall-cmd --add-port=443/tcp --zone=public --permanent
success
firewall-cmd --reload
success
Now create the database, the user, and its permissions so that it can be used by OCS Inventory
mysql -u root -p
CREATE DATABASE ocsweb;
GRANT ALL ON ocsweb.* TO 'ocs'@'localhost' IDENTIFIED BY 'ocspss';
FLUSH PRIVILEGES;
Exit;
After this, we can start the installation.
Download and install OCS Inventory
Now we will be able to perform the installation. First, install the PERL modules that the system has:
dnf install make gcc perl-Archive-Zip perl-Compress-Zlib perl-DBD-MySQL perl-DBI perl-Mojolicious perl-Net-IP perl-Plack perl-SOAP-Lite perl-Switch perl-XML-Entities perl-XML-Simple perl-Apache-DBI perl-Digest-SHA1 perl-Apache2-SOAP
Next, add the OCS Inventory repository for CentOS 8
dnf install https://rpm.ocsinventory-ng.org/ocsinventory-release-latest.el8.ocs.noarch.rpm
And finally, install it by running:
dnf install ocsinventory

Once installed, it is necessary to copy the sample database into the database we have created:
mysql -u root -p ocsweb < /usr/share/ocsinventory-reports/ocsreports/files/ocsbase.sql
Now, enable the rewrite modules in Apache by editing its configuration file:
nano /etc/httpd/conf/httpd.conf
At the end of the document, add the following:
LoadModule rewrite_module modules/mod_rewrite.so
Apply the changes, restarting the Apache service:
systemctl restart httpd
Now we can complete the installation.
Using OCS Inventory
The next step is to open your preferred web browser and access http://your-server/ocsreports/install.php.
Note: replace your-server with the IP address of the server or domain.

You should see the database configuration screen. Type the parameters.
So, You will then see a screen informing you that the database connection was successful.
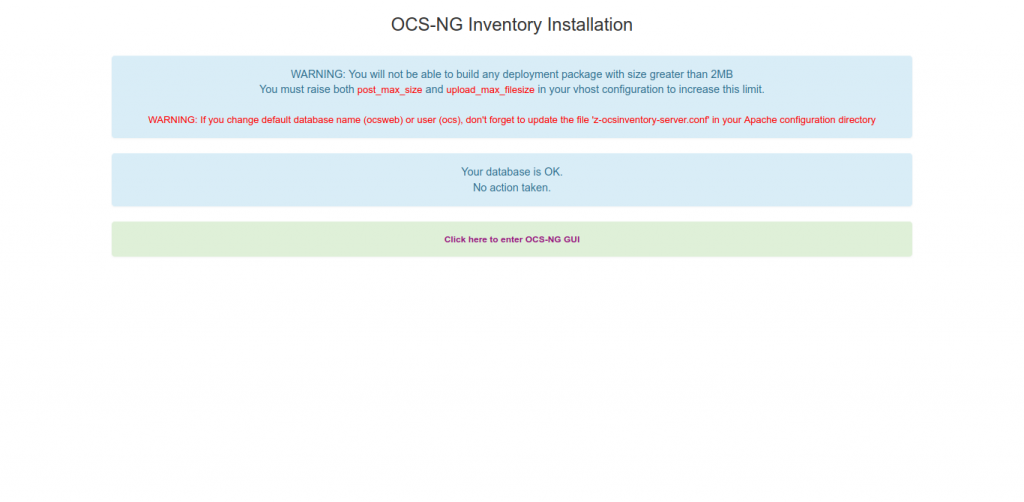
Next, update the database version by clicking on the Perform the update button and you will see this message

Then the login screen

Then, Log in with the default credentials admin/admin and now you have the OCS Inventory server ready.

Conclusion
So, OCSInventory is a great application that we can take full advantage of in an organization, whether it is small or large. Well, today you have learned to install it on a computer with CentOS 8.

dnf install –enablerepo=powertools ocsinventory
If use dnf install ocsinventory, we have error