

Ubuntu 20.04 is a very popular distribution on servers because it is quite stable and offers commercial support. That is why it is necessary to learn how to install administrative tools. So, in this post, you will learn how to install GLPI with Lighttpd on Ubuntu 20.04. This French inventory system also allows you to have a ticketing system that will allow you to give technical support in your organization in an orderly way.
According to Wikipedia:
“GLPI is an open source IT Asset Management, issue tracking system and service desk system (..) The solution is able to build an inventory of all the organization’s assets and to manage administrative and financial tasks”
It is open source because it is released under the GPLv2 license which makes it accessible to many. Moreover, it is perfectly compatible with many operating systems.
So, let us start the job.
GLPI and Lighttpd on Ubuntu
1.- Configuring a web server with Lighttpd and PHP on Ubuntu 20.04
As expected, the first thing we have to do is install Lighttpd in our system. But not only that but also, we have to add support to PHP.
For that, you can read our post:
How to install Lighttpd on Ubuntu 20.04?
You should also install other PHP modules to avoid problems with the execution of the program:
php7.4 php7.4-curl php7.4-zip php7.4-gd php7.4-intl php-pear php7.4-imagick php7.4-imap php-memcache php7.4-pspell php7. 4-tidy php7.4-xmlrpc php7.4-xsl php7.4-mb php7.4-ldap php-cas php-apcu php7.4-mysql php7.4-fpm
Once you’ve installed them, you can continue.
2.- Working with MariaDB
As is well known, GLPI requires a database manager. In this case, MariaDB will be chosen because it is fast, easy to use, and perfectly compatible.
To install it, just execute the following command:
:~$ sudo apt install mariadb-server
Reading package lists… Done
Building dependency tree
Reading state information… Done
The following additional packages will be installed:
galera-3 libcgi-fast-perl libcgi-pm-perl libconfig-inifiles-perl libdbd-mysql-perl libdbi-perl libencode-locale-perl libfcgi-perl libhtml-parser-perl
libhtml-tagset-perl libhtml-template-perl libhttp-date-perl libhttp-message-perl libio-html-perl liblwp-mediatypes-perl libmysqlclient21 libsnappy1v5
libterm-readkey-perl libtimedate-perl liburi-perl mariadb-client-10.3 mariadb-client-core-10.3 mariadb-common mariadb-server-10.3 mariadb-server-core-10.3
mysql-common socat
Suggested packages:
libclone-perl libmldbm-perl libnet-daemon-perl libsql-statement-perl libdata-dump-perl libipc-sharedcache-perl libwww-perl mailx mariadb-test tinyca
The following NEW packages will be installed:
galera-3 libcgi-fast-perl libcgi-pm-perl libconfig-inifiles-perl libdbd-mysql-perl libdbi-perl libencode-locale-perl libfcgi-perl libhtml-parser-perl
libhtml-tagset-perl libhtml-template-perl libhttp-date-perl libhttp-message-perl libio-html-perl liblwp-mediatypes-perl libmysqlclient21 libsnappy1v5
libterm-readkey-perl libtimedate-perl liburi-perl mariadb-client-10.3 mariadb-client-core-10.3 mariadb-common mariadb-server mariadb-server-10.3
mariadb-server-core-10.3 mysql-common socat
0 upgraded, 28 newly installed, 0 to remove and 0 not upgraded.
Need to get 21.1 MB of archives.
After this operation, 173 MB of additional disk space will be used.
Do you want to continue? [Y/n]
Then, it is convenient to secure the installation and define a password to the root user with the following script:
:~$ sudo mysql_secure_installation
After defining a root password, answer the configuration questions. In my case, I have answered Y to each of them.
Remove anonymous users? [Y/n]
Disallow root login remotely? [Y/n]
Remove test database and access to it? [Y/n]
Reload privilege tables now? [Y/n]
Once you’re done, access MariaDB’s shell.
:~$ sudo mysql -u root -p
And create the database:
> CREATE DATABASE glpidb;
Then, create a new user with enough permissions on this database. This is an efficient security measure that will help prevent attacks on the whole system.
> GRANT ALL PRIVILEGES ON glpidb.* TO 'glpiuser'@'localhost' IDENTIFIED BY 'password';
Refresh permissions and exit the MariaDB shell.
> FLUSH PRIVILEGES;
> exit;

3.- Download and install GLPI with Lighttpd
Now we can download GLPI. To do this, navigate to the /tmp/ folder and from there download with the wget command.
:~$ cd /tmp/
:~$ wget -c https://github.com/glpi-project/glpi/releases/download/9.4.5/glpi-9.4.5.tgz
Then, unzip the downloaded file:
:~$ tar -xvf glpi-9.4.5.tgz
Now move it to Lighttpd’s root directory in Ubuntu.
:~$ sudo mv glpi /var/www/html/
Make Lighttpd the owner of the folder and assign it the correct permissions so that it can run.
:~$ sudo chmod 755 -R /var/www/html/
:~$ sudo chown www-data:www-data -R /var/www/html/
4.- Creating a new Lighttpd Virtualhost for GLPI
So, for Lighttpd to be able to handle GLPI correctly, it is convenient to make a new Virtualhost.
So, create a new folder called vhosts.d in /etc/lighttpd/ that will be the directory where the new Virtualhost configuration file will be.
:~$ sudo mkdir -p /etc/lighttpd/vhosts.d/
Then, modify the Lighttpd configuration file:
:~$ sudo nano /etc/lighttpd/lighttpd.conf
And add the next line:
include_shell "cat /etc/lighttpd/vhosts.d/*.conf"
Then save the changes and exit the editor. This line simply adds to the main configuration all the new virtualhost we create.
Now create the new virtualhost:
:~$ sudo nano /etc/lighttpd/vhosts.d/glpi.conf
And add the following content:
$HTTP["host"] =~ "(^|.)glpi.osradar.lan$" {
server.document-root = "/var/www/html/glpi"
server.errorlog = "/var/log/lighttpd/glpi"
accesslog.filename = "/var/log/lighttpd/glpi"

url.rewrite = (
"^/framework([^?]/)(\?.)?$" => "/framework$1index.php$2",
"^/framework/([^?])(\?.)?$" => "/framework/$1.php$2"
)
$HTTP["url"] =~ "^/glpi" {
url.access-deny = ("")
}
}
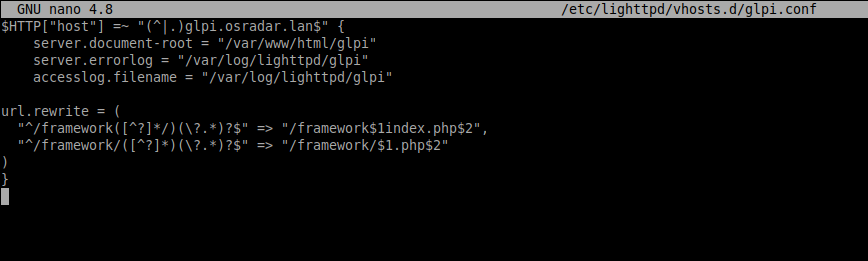
Again, save the changes and close the file. Do not forget to replace glpi.osradar.lan with your domain.
To check that there are no syntax errors and that everything is fine, run the following command:
:~$ sudo lighttpd -t -f /etc/lighttpd/lighttpd.conf
Syntax OK
That means that everything is fine and we can now restart the Lighttpd server to apply the changes and enable the new Virtualhost.
:~$ sudo systemctl restart lighttpd
All that remains is to complete the installation from the web interface.
5.- Install GLPI with Lighttpd on Ubuntu 20.04
Now open your web browser and go to http://your-server and you will see the following:
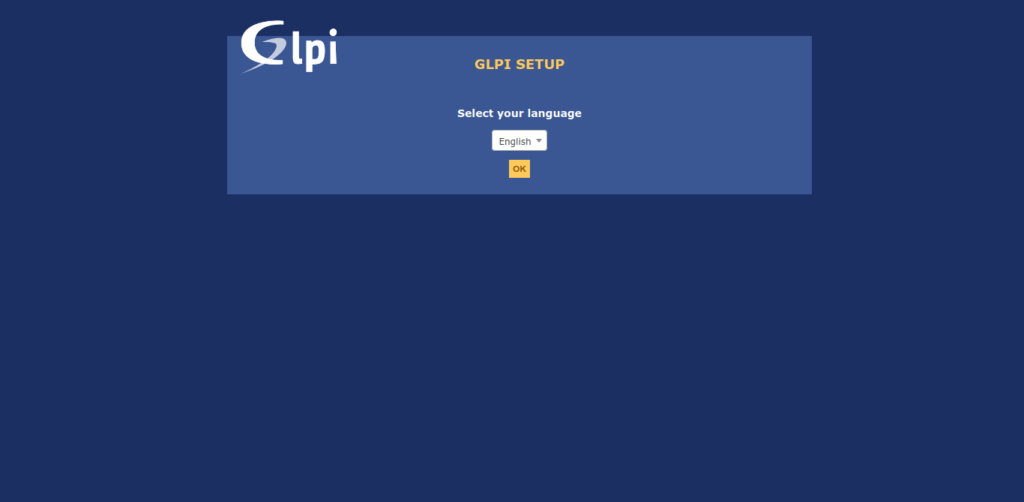
After choosing the language of the installation, you can continue.
Then, accept the license terms.

On the next screen, choose the option to install since it is a new installation.

Then, the installer will check our server. All the modules are installed so you can continue.

Now, type the credentials of the database we just created.

Then select the database for GLPI.

Proceed to start the installation.

Also, you can help the development team by sending anonymous statistics.

In the end, everything will be fine and you will see the default credentials.

All you have to do is log in.

And finally, you will see the dashboard of the application.

So, enjoy it.
Conclusion
GLPI is an application to control the informatics equipment of your company. It is an administrative tool, more than anything. It is created in PHP and uses MariaDB as a database manager.
We are talking about a solid tool used by many organizations worldwide. Free is not a problem for small projects but it is solid enough to be used in larger ones
Please share this post and join our Telegram channel.

This is one of the best and easy to understand installation guide out there, I appreciate your work helping IT community.
Quick question about the error I’m getting.
sudo lighttpd -t -f /etc/lighttpd/lighttpd.conf
2020-08-03 10:42:34: (configfile-glue.c.46) DEPRECATED: don’t set server options in conditionals, variable: server.errorlog
Syntax OK
I get same error with default domain glpi.osradar.lan or when I changed with my domain name. What am I missing ?
Hi, server.error is deprecated. For now, you can use it.
In the next versions, I will update the instructions.