

Hello! It is very important that the computer runs smoothly. Therefore, speeding up the system shutdown is a good measure to take. Moreover, it will save time just by making a few adjustments. Certainly, speeding up Windows startup is very important. But we can also speed up the Windows 10 shutdown. Sometimes we think that speeding up the system means buying a new computer. However, we can improve it with some tricks.
Use the Windows 10 quick startup/shutdown feature
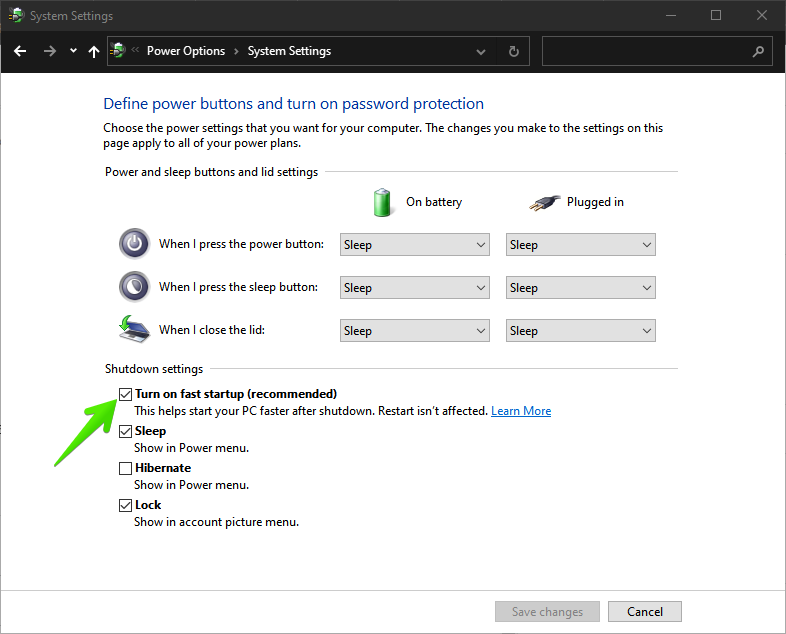
This functionality has been included since Windows 8. Therefore, the system skips some steps to turn on. This is what the fast startup function is all about. Likewise, it also serves to speed up the shutdown. It should be enabled by default in Windows 10. However, let’s check it out. With this intention, press the Win+X combination. Once there, click on Power Options.

Now, in the right menu look for the Related settings option. Then click on Additional power settings.

Next, you have to select the behavior of the Power button.

First, click on Change settings that are currently unavailable. Finally, you can check the box Turn On fast startup (recommended).
Speed up Windows 10 shutdown using the registry editor.
Next, we will accelerate the system shutdown. For this purpose, we will use the Windows registry editor. As always, we advise you to proceed with caution. Since this is a very sensitive element of the system. In addition, we recommend you make a backup of the registry.
On the other hand, the intention is that the system waits less time for programs at shutdown. So it will force the shutdown, helping to speed up the process. Please do the following. First, press the Win+R combination. Next, run the Regedit command.

Now, locate the following address in the bar:
HKEY_LOCAL_MACHINE\SYSTEM\CurrentControlSet\Control
Next, in the left column, double click on WaitToKillServiceTimeout.

Now, we will edit the string value. Note that the data represents the waiting time before closing the programs. Also, the default is 5,000 milliseconds (5 seconds). Therefore, we can lower the value to 4,000 milliseconds. Which is the minimum recommended. However, we can lower it further. However, programs may close improperly.

Detects programs that slow down the shutdown
Some programs tend to slow down the shutdown of Windows 10. Therefore, we should be able to fix these bugs. This process is easy to do through the Windows 10 Event Viewer. We just need to identify the processes identified with the number 203. First, press Win+R and run the eventvwr command.

Now, in the left menu locate the following path:
Applications and services logs>Microsoft>Windows>Diagnostics-Performance
Then double click on Operational in the center column.

This action will open the element. Consequently, in the menu on the right click on Filter current log.

Consequently, a new window will open. Once there, locate the All events ID checkbox. Please add the value 203 and press OK.

Note that the events identified with the value 203 represent those that slow down the system shutdown. Consequently, check the items for software that may cause a shutdown failure. If so, you can uninstall it to correct the fault.

Ultimately we have seen how to speed up the shutdown in Windows 10. As final tips, it is advisable to keep the system up to date. You should also close all windows and programs by hand before shutting down the system. See you soon!
