

Hello! If you want to manage networks and connect to Wi-Fi on Windows, let’s explain everything you need to know. We will try to cover different topics. In effect, we will see how to configure the system to stop searching for networks. Although, we will also learn how to share the signal with other devices and that they can connect to the Internet without problems. The idea is to show you step by step all you have to do. Please remember that you can use the system configuration itself, without having to install anything additional. However, you can also use free apps to help you better manage your wireless networks. Finally, the goal is to get good coverage and make everything work properly. That is, without appearing the feared cuts when browsing or using some application. Read on to learn how to manage Wi-Fi networks in Windows 11.
How to configure Windows not to scan for Wi-Fi
By default, Windows is configured to constantly scan for Wi-Fi connections. This is certainly handy. However, you may wish to do without it, in order to extend battery life. Or to save resources. Well, let’s see how to do it. It is a very simple procedure and for which we will not have to install any additional plugins. We are only going to use the operating system’s own configuration.
The first thing we are going to do is to go to Start, look for services and access. There we will see a large list of operating system services that we will be able to modify. All of them will be configured as they come when installing the OS, unless we have made some change. We can also access simply with the key combination Windows+R and execute services.msc.

When you are at this point, look for the WLAN Auto Config service. We have to click with the right button of the mouse and click on Stop. Then go to Properties and under Startup type, which will be marked as Automatic, change it to Manual.

Once this is done, we simply have to click on Apply and we will accept the changes. From this moment on, Windows will not be searching for Wi-Fi networks automatically. We must also restart the computer for the changes to take effect correctly.
You should know that this change is totally reversible. Consequently, it is possible to return to the previous scenario. That is, Windows will automatically search for networks again. Consequently, we only have to follow the steps that we have explained again. Only this time, we switch back to Automatic. Press OK, restart the computer, and that’s it.
How to prevent Windows from connecting to a specific network
After having explained what we can do to prevent Windows from automatically searching for Wi-Fi networks, we are now going to focus on preventing it from connecting to a specific network. It is possible that we do not want it to automatically access a Wi-Fi to which we have previously connected. Even to an access point we have at home. This can also be done easily. It can be interesting for the same reasons as mentioned above. It is especially useful for not connecting only to a certain network that has a weak signal.
Windows configuration
If at some point we connect to a network, and now we do not want it to connect automatically, we can avoid it. To do this, we have to follow these steps. First, go to Start and then go to Windows Settings. Then we go to Network and Internet, click on Wi-Fi and access Manage known networks.

A list of all the wireless networks to which we have ever connected will be displayed. It does not matter if they are open networks or have passwords. What Windows does is to store this information to connect quickly as soon as it detects it. It is interesting to save time, but sometimes we may not want this.
What we need to do is to find the network we do not want to connect to. It can be a Wi-Fi repeater, for example. We click on the name, and we will see a small box where we will see the Forget button.

By simply performing this step, Windows will automatically stop connecting to that wireless network. It will delete all stored information. In addition, this also includes the password. If in the future, we want to connect again, we will have to click on Connect and manually enter the password.
Therefore, following these steps, we can also prevent Windows from automatically connecting to a specific network. It is an alternative if we do not want that it stops looking for networks constantly, but we are not interested that it can connect to a certain network. It is a simple and fast process. In addition, we can easily revert reverse it easily if in a given moment we are interested that it returns to connect.
How to do it from the command prompt.
We can also do this using commands. Moreover, in this case, it would be valid both for networks we are connected to now and for those we are not connected to. In short, it is valid for any network that we have saved. An important issue is that to execute these commands, it is mandatory to do it as an administrator. To do so, type and select Run as administrator. Also, by clicking on Command Prompt with the right mouse button, this option appears.

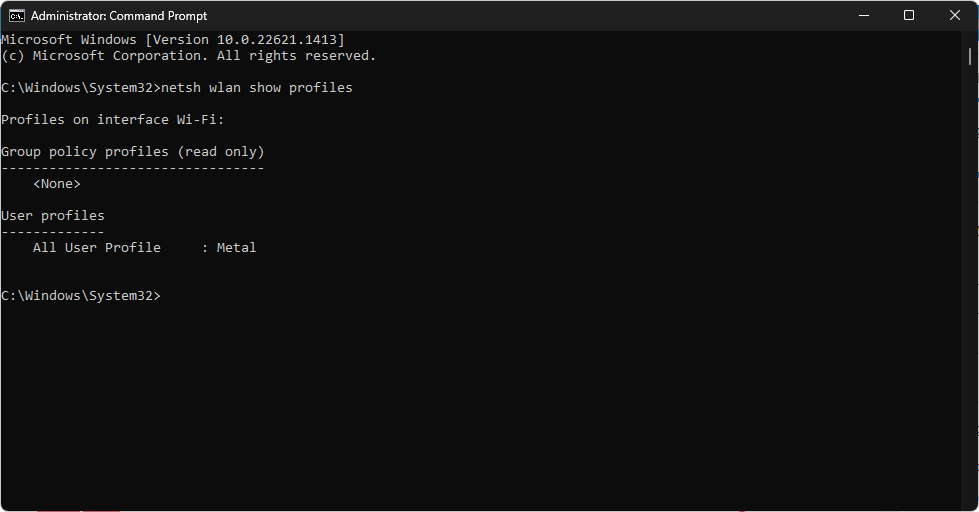
Now we are going to use a command to view the profiles of the saved Wi-Fi networks. With this in mind, we will use netsh with the following parameters:
netsh wlan show profiles
In case we want to prevent Windows from automatically connecting to a Wi-Fi network, we will have to use this other command:
netsh wlan set profileparameter name=network name connectionmode=manual
Here, what we have to do is to replace Network Name with the name of the Wi-Fi network you want to modify. This would be the command in which our Wi-Fi network profile has been executed correctly, so that from now on the connection is made manually.

Instead, this would be the command syntax if we want that Wi-Fi network to start automatically:
netsh wlan set profileparameter name=network name connectionmode=auto

This is the example of the execution to have an automatic connection:

In the hypothetical case that we do not know if we have the Wi-Fi connection on automatic or manual, we would use this other command:
netsh wlan show profile network name
These are the results we would get if that Wi-Fi network has automatic connection:

Very well, this way we begin to see how to manage the Wi-Fi connections with Windows 11. Bye!
