

Hello! The arrival of Windows 11 is a recent development. For this reason, we are just getting to know its possibilities and potentialities. In fact, it is a system that allows the installation of several applications focused on increasing the productivity of the system. Well, one of these apps is Git. With it, we will be able to make a better control of the files and their source codes. Consequently, it enables a better control of the different versions. Git has been developed as a distributed and scalable revision control system. It is also integrated with a set of commands to make working in Windows 11 much more comprehensive. Git works as an open source distributed version control system. Therefore, it facilitates the management of projects of any size. Read on to learn how to install Git on Windows 11.
Git functions.
Before we go any further, let’s take a look at some Git features:
- Frictionless context switching
- Role-based workflow
- Role-based lines of code
How to install Git on Windows 11
The first thing we have to do is to validate the availability of Git on the system. With this in mind, we will use a system token. To complete this, click on the search icon and enter the term CMD.

Once the console is displayed, please run git and verify that it is not available.

Downloading and installing Git.
The first thing you have to do is to go to the official Git page. Once there, please select the Windows version.

After downloading the file, you have to run it to start the installation. With this in mind, approve the system warning signal. Next, the installation process will begin. Please click Next.

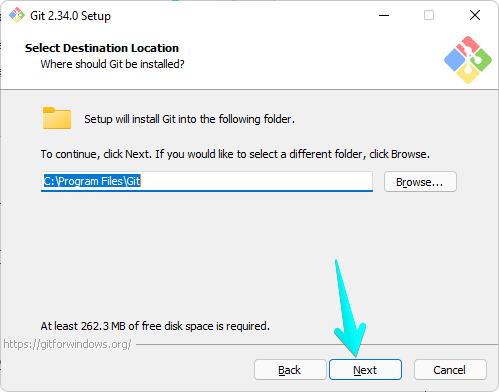
In the next window, please define the path where Git will be installed.
By clicking Next, you will choose the components to use with Git. Indeed, you can create shortcuts, associate .sh or .git files, support large LFS files and more.

The wizard also allows you to set a name for the shortcut.

Configuring the installation options
Recall that Git requires an editor. Therefore, the program assigns its default editor. In fact, the software uses the editor by Vim. However, this is an editor that can be complex to use. Consequently, we will display the available options.


Next, we will select Notepad as the default Git editor in Windows 11.

There are certainly other editors available. However, they require additional downloads. In addition, this option can be modified at a later time. Next, we define the name of the repository. By default, in the first use, the master repository will be used. However, it is possible to set a custom name.

Next, it’s time to set up the ROUTE environment. The most conservative option limits the use of Git to Git Bash only. The second option allows managing these commands from Windows terminals and third-party solutions as well. Finally, Git and the optional Unix tools can be used from the command prompt. We recommend using the default option, which is the second one.

Next, define the SSH executable. Indeed, you can use the OpenSSH packaging that comes with Git. Or use an external OpenSSH. Please use the default option.

Setting Git variables
In the next window, we will define parameters related to HTTPS. In fact, you can choose the OpenSSL library. On the other hand, you can use the native Windows security library. We recommend you to use the OpenSSL library.

Now it is time to select the line ending conversion. Please select the UNIX converter. Indeed, this allows the interaction between the systems to be much more complete.

In this window, it is time to choose the terminal to use. Accordingly, we will use the MinTTY terminal for its design and versatility.

After pressing Next, it is time to configure the behavior of git pull. This is a command created to be able to manage files in a remote repository. So, we will leave it as default.

Now it is time to set up the credential system. We will use the system managed by Git.

Subsequently, we configure some extra options, such as system cache and symbolic links.

It is also possible to enable special functions for testing. If you are not sure what you are doing, it is better not to check the boxes. Pressing Install will start the process of installing Git on Windows 11.

The Git installation process will start immediately.

Checking the operation
After the installation is complete, please check the Launch Git Bash box.

As a result, the terminal will open:

From now on, it is possible to use Linux commands: cd, mkdir, ls.

Finally, we run git –version to see the version of Git used.

Okay, so we have seen how to install Git on Windows 11. So now you have this tool for development. See you soon!
