

Hello, friends. Enabling ClamAV on Nextcloud is a logical step to take to ensure the integrity of our files and to protect our server and the operating systems such as Windows that will access it. So, in this post, you will learn how to do it.
In this post, it is assumed that we have an instance of Nextcloud configured correctly as we taught you in this post.
So that will be our starting point.
Enabling ClamAV on Nextcloud
1.- Install ClamAV on Ubuntu 20.04
The first thing we have to do is to install ClamAV from the official Ubuntu 20.04 repositories or from the distribution you are using.
sudo apt install clamav clamav-daemon
Reading package lists… Done
 Building dependency tree
 Reading state information… Done
 The following additional packages will be installed:
   clamav-base clamav-freshclam libclamav9 libmspack0 libtfm1
 Suggested packages:
   clamav-docs daemon libclamunrar9
 Recommended packages:
   clamdscan
 The following NEW packages will be installed:
   clamav clamav-base clamav-daemon clamav-freshclam libclamav9 libmspack0 libtfm1
 0 upgraded, 7 newly installed, 0 to remove and 24 not upgraded.
 Need to get 1,403 kB of archives.
 After this operation, 5,199 kB of additional disk space will be used.
 Do you want to continue? [Y/n]
After the installation is done, you can start the service:
sudo systemctl start clamav-daemon.service
And then check the status of it
sudo systemctl status clamav-daemon.service
● clamav-daemon.service - Clam AntiVirus userspace daemon
      Loaded: loaded (/lib/systemd/system/clamav-daemon.service; enabled; vendor preset: enabled)
     Drop-In: /etc/systemd/system/clamav-daemon.service.d
              └─extend.conf
      Active: active (running) since Thu 2021-01-14 20:56:34 CET; 2s ago
        Docs: man:clamd(8)
              man:clamd.conf(5)
              https://www.clamav.net/documents/
     Process: 20021 ExecStartPre=/bin/mkdir -p /run/clamav (code=exited, status=0/SUCCESS)
     Process: 20024 ExecStartPre=/bin/chown clamav /run/clamav (code=exited, status=0/SUCCESS)
    Main PID: 20027 (clamd)
       Tasks: 1 (limit: 2286)
      Memory: 129.0M
      CGroup: /system.slice/clamav-daemon.service
              └─20027 /usr/sbin/clamd --foreground=true
 Jan 14 20:56:34 osradar systemd[1]: Starting Clam AntiVirus userspace daemon…
 Jan 14 20:56:34 osradar systemd[1]: Started Clam AntiVirus userspace daemon.
As you can see, everything is going well.
2.- Download Antivirus for File Nextcloud App
ClamAV is the backend of an official Nextcloud extension that scans the files we upload.
In the official documentation, we are told that it is already installed by default, but in my case, it was not.
There are no problems. From a client machine, go to this link and download the latest available version of the extension.
Then, copy it to the server using the scp command
scp files_antivirus.tar.gz [user]@[your-domain]:/tmp
And on the server, decompress it in the place where the Nextcloud APPS are.
sudo tar xvzf /tmp/files_antivirus.tar.gz -C /var/www/html/nextcloud/apps/
You can check that everything is ok, by accessing the apps folder and checking that there is a folder called files_antivirus
cd /var/www/html/nextcloud/apps/
So, we’re doing well.
3.- Enabling ClamAV on Nextcloud
So, we have to enable the add-on for ClamAV to work its magic.
To do so, from the Nextcloud dashboard, click on your user and access the APPS section.

Then download and locate the add-on we have just installed, which is Antivirus for Files, and click on Enable.

Then, you will be asked for the password of the Nextcloud admin user that you defined during the installation.

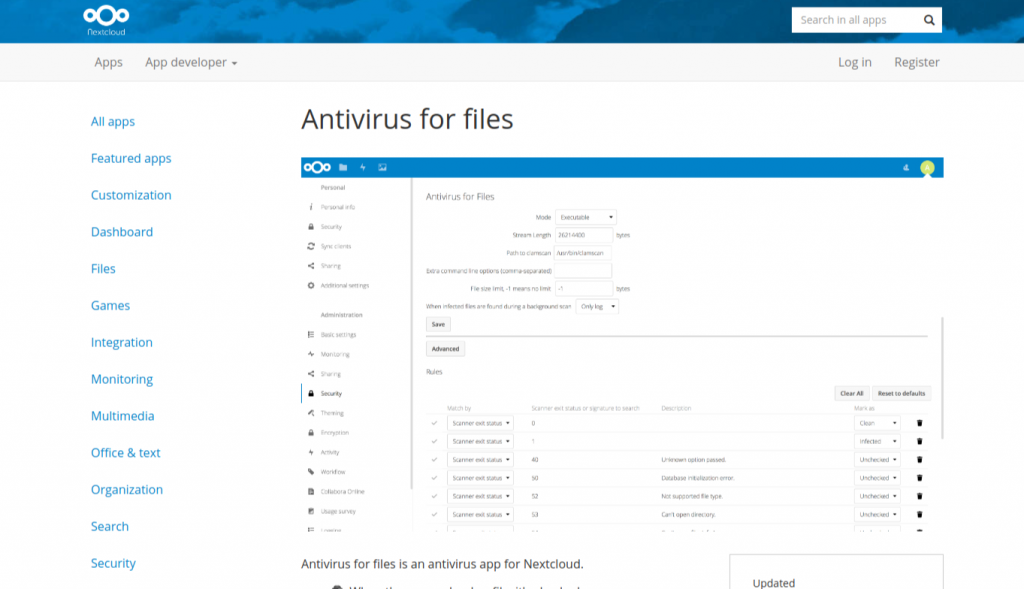
After that, it is enabled, you have to go to the Nextcloud settings, in the Security section, and in the Antivirus for Files section, follow these settings:

Then, click on Save and you’re done. ClamAV will now monitor your files for viruses.
Conclusion
So, Nextcloud is a great tool but when working with files it is best to have an anti-virus, especially if it is to be used with Windows computers that are very vulnerable to these situations. So, this tutorial makes the integration between ClamAV and Nextcloud very easy to do.
