

It’s always a good idea to have applications to manage your personal or business finances. With it, you will be able to have an ordered form all the countable information of one determines, especially if many transactions are carried out in line. Therefore, today I will teach you how to install Akaunting in Ubuntu 18.04.
Akaunting is online accounting software for businesses. It is a very simple application but it is powerful too. It is open source and this is a great advantage because with it you will be sure that your privacy is guaranteed.
Besides, it’s totally free. However, don’t be fooled by its price is a great application and with many features. For example, it has a great reporting system, you can handle the cash flow without problems. On the other hand, it is accessible from multiple mobile devices because it is built with web technologies.
So, let us start to install Akaunting.
1. Install Apache and PHP
Akaunting is a web application. In other words, it requires a web server and jointly PHP. You can use Ngnix but for now, we will use the Apache web server.
So, first install Apache web server.
:~$ sudo apt install apache2

So, it is necessary to enable the service. Then, check the service status.
:~$ sudo systemctl enable apache2
:~$ sudo systemctl status apache2

Next, install PHP and all the requires modules.
:~$ sudo apt install php7.2 libapache2-mod-php7.2 php7.2-common php7.2-imap php7.2-mbstring php7.2-xmlrpc php7.2-soap php7.2-gd php7.2-xml php7.2-intl php7.2-mysql php7.2-cli php7.2-ldap php7.2-zip php7.2-curl unzip

In order for Akaunting to work optimally, it is necessary to make some changes in the PHP configuration.
So, open the PHP configuration file and make the following changes:
:~$ sudo nano /etc/php/7.2/apache2/php.ini
file_uploads = On
allow_url_fopen = On
memory_limit = 256M
upload_max_filesize = 30M
post_max_size = 40M
max_execution_time = 60
zend.assertions = 0
display_errors = Off
max_input_vars = 1500
date.timezone = YOUR_TIMEZONE
In order to check that everything is OK with PHP and Apache, create a file on /var/www/html/ and name it test.php. After that, add the following.
:~$ sudo nano /var/www/html/test.php
<?php
phpinfo();
?>

Restart apache.
:~$ sudo systemctl restart apache2
Next, open your web browser and open it. Go to http://SERVER_IP/text.php. You should see something like this.

So, you can continue.
2. Install MariaDB
The next step is to install MariaDB as the database handler. Akaunting is a program that handles a lot of information so it is necessary to store it in a database and MariaDB stands out for its robustness, simplicity of use and above all reliability.
So, let us install MariaDB.
:~ sudo apt install mariadb-server

After that, configure MariaDB using the mysql_secure_installation script. With this script, you can set the root password.
:~$ sudo mysql_secure_installation

You will be asked a few questions, for this tutorial are irrelevant and you can answer as you want. However, read them carefully to find the best configuration for you.
Next, create the database and user for Akaunting.
:~$ sudo mysql -u root -p
CREATE DATABASE akauntingdb;
GRANT ALL PRIVILEGES ON akauntingdb.* TO 'akauntinguser'@'localhost' IDENTIFIED BY 'pss';
FLUSH PRIVILEGES;
exit;
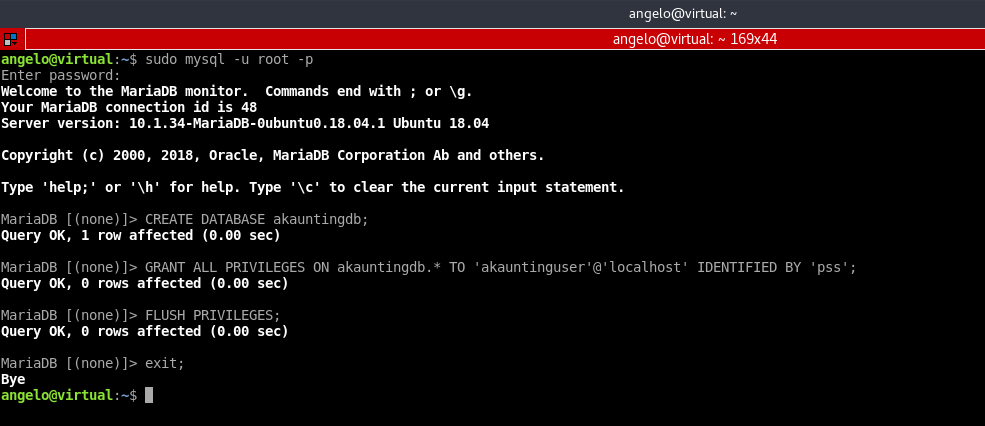
So, that’s all with MariaDB.
3. Install Akaunting
Now it’s time to install Akaunting. To do this, first, download the latest stable version.
:~$ curl -O -J -L https://akaunting.com/download.php?version=latest

Next, decompress the file on the apache root directory. But first, create a folder.
:~$ sudo mkdir -p /var/www/html/akaunting
:~$ sudo unzip Akaunting_*.zip -d /var/www/html/akaunting/

Now it is necessary to modify the permissions of that folder so that there are no problems when running Akaunting.
:~$ sudo chown -R www-data:www-data /var/www/html/akaunting/
:~$ sudo chmod -R 755 /var/www/html/akaunting/

4. Create a VirtualHost for Akaunting
In order for Apache to handle Akaunting correctly, it is necessary to make a Virtualhost. To do this, run this command.
:~$ sudo nano /etc/apache2/sites-available/akaunting.conf
And add the following:
<VirtualHost *:80>
   ServerAdmin [email protected]
   DocumentRoot /var/www/html/akaunting
   ServerName osradar.lan
   DirectoryIndex index.html index.php
<Directory /var/www/html/akaunting/>
   Options +FollowSymlinks
   AllowOverride All
   Require all granted
</Directory>
ErrorLog ${APACHE_LOG_DIR}/akaunting_error.log
CustomLog ${APACHE_LOG_DIR}/akaunting_access.log combined
</VirtualHost>
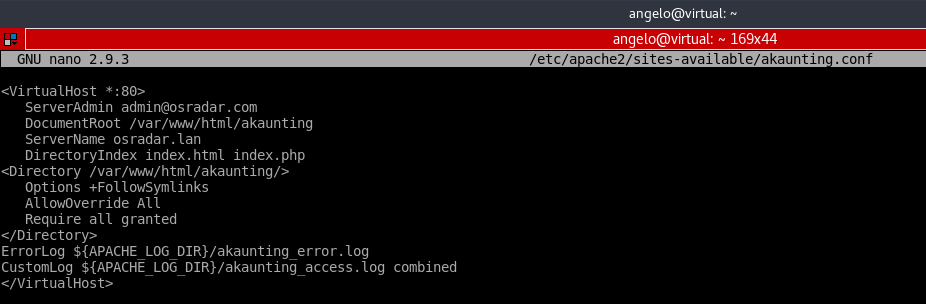
Replace the value of ServerAdmin and ServerName for yours.
Next, enable the new virtual host. Enable the rewrite module for apache. Finally, restart apache.
:~$ sudo a2ensite akaunting
:~$ sudo a2enmod rewrite
:~$ sudo systemctl restart apache2

5. Complete the installation from the web
Now it is necessary to access from the web to complete the installation of Akaunting. Open your web browser and go to your domain. You should see this. So, select the installation language.

Next, type the databases credentials.

Then, complete the company and admin details.

Now, you will see the login screen. Type your credentials.

Next, you will see the wizard. Scroll down and click on save.

Next, you will see the currencies screen. So, you can add some of them. Or click on skip.

So, the next step is to configure the taxes.

Finish the process.

Next, you will see the dashboard.

And that’s it.
Please share this post with your friends.
