

Today we are going to learn that How To Install Postfix Mail Server on RHEL / CentOS 8. Let’s have a short Introduction about Postfix.
What is Postfix?
Postfix is a common Mail Server, many huge distributions are shipped with Postfix deployed by default. By the default configuration it permits local mailing , however in itself it is very useful on a machine used by many customers, or even if there may be no such visitors, many services dump their reviews and messages into e-mails, which is introduced to the root consumer locally, so the sysadmin might be noticed on any activities when he/she logs in and switches to root user.
A simple instance could be scheduled cron jobs: Any output no longer redirected from the output of a script strolling from cron can be wrapped to an electronic mail and will be delivered to root’s mailbox, so the administrator does no longer even ought to make any effort to have the reports of the nightly backup jobs to hand.
At the same time as this standalone mode is virtually a nice carrier as it’s far, Postfix is a complete-fledged Mail Server, capable of doing the following functions:
- receiving of mails
- forwarding
- relaying
- filtering of e-mails
Postfix essentially have every feature we need for a Mail Server.
Step 1: Update Your System
As it is good practice to update your system before installing new packages as we do every time.
sudo dnf update
Make sure that you are not using any other mail servers as they will raise problems with Postfix.
Step 2: Set Hostname
Run the following command with root privileges or root user as it will require you to enter root password.
hostnamectl set-hostname server1.osradar.com
exec bash
Then add the following entries in the /etc/hosts file.
sudo nano /etc/hosts
104.37.86.29                server1.osradar.com

After it Save & exit the hosts file.
Step 3: Installing Postfix Mail Server
After doing all the above steps, run the following command to Install Postfix Mail Server.
sudo dnf postfix

Then start & enable postfix services.
sudo systemctl start postfix
sudo systemctl enable postfix
Now, check the status of Postfix services.

You can see that the Postfix service is running fine. It’s time to configure the Postfix to send emails from Postfix locally to our Server.
Step 4: Installing mailx email client
Install mailx email client feature before proceeding further by
sudo dnf install mailx

Step 5: Configuring Postfix Mail Server
Now, configure the Postfix file located under /etc/postfix/main.cf with root access. Open the file with your favorite editor and make certain changes as required like given below
sudo nano /etc/postfix/main.cf
And then do the following changes
##############Uncomment these and set your domain ##############
myhostname = server1.osradar.com
mydomain = osradar.com
myorigin = $mydomain
 ############## Uncomment and Set inet_interfaces to all ##############
 inet_interfaces = all
 ##############Change to all ##############
 inet_protocols = all
  ############## Comment ##############
 mydestination = $myhostname, localhost.$mydomain, localhost
 ############## Uncomment ##############
 mydestination = $myhostname, localhost.$mydomain, localhost, $mydomain
 Uncomment
 mynetworks = 168.100.189.0/28, 127.0.0.0/8
 Uncomment
 home_mailbox = Maildir/

After doing the changes, save the configuration file & exit.
Then restart postfix services.
sudo systemctl restart postfix
Step 6: Test Postfix Mail Server
Make sure that the configuration is working fine, test it by creating user
useradd postfix
passwd osradar
After it install the telnet to send emails.
Then run the following command to send email from sabi local user to another osradar user.
telnet localhost smtp
or
telnet localhost 25
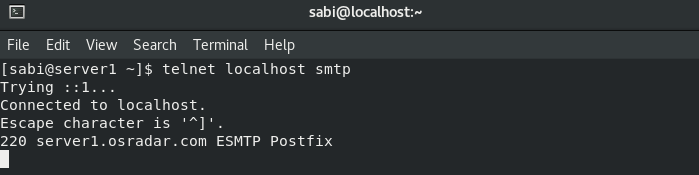
It confirms that the Mail Server is working fine. Then type the command
ehlo localhost
You will see the following output:

This shows that all settings are fine & you can find the email sent at the user’s home directory. Run the following commands highlighted in green to send email.

To read this email, just use the cat command with the above result:
sudo ls /home/sabi/Maildir/new
1582039913.Vfd00I10188c4M499438.server1.osradar.com
The Output will be similar to this as I’ve highlighted with different color. You can see how it works

Logs of Postfix
You can find the Postfix mail server logs under /var/log/maillog file.
tail -f /var/log/maillog

Step 7: Secure Postfix Mail Server
As to send email over Internet require Security. So, it is good practice to use SSL certificates. You can get SSL from any trusted authority or Self Signed. Here we will use Self Signed using openssl.
Run the below command to install openssl
sudo dnf install openssl -y
Now generate the private key & CSR(Certificate Signing Request) using below commands
openssl req -nodes -newkey rsa:2048 -keyout mail.key -out mail.csr

openssl x509 -req -days 365 -in mail.csr -signkey mail.key -out mail.crt

Then copy the private key and certificate file to /etc/postfix directory.
sudo cp mail.key mail.crt /etc/postfix
After it update the Private key & Certificate file’s path in postfix config file.
sudo nano /etc/postfix/main.cf
smtpd_tls_cert_file = /etc/postfix/mail.crt
smtpd_tls_key_file = /etc/postfix/mail.key
smtpd_tls_security_level = may
Then restart postfix services.
sudo systemctl restart postfix
Now, try to send email from sabi to osradar.
echo "New Message" | mailx -s "Test email from Postfix MailServer" -r [email protected] [email protected]
You can read the email using the following command
sudo cd /home/osradar/Maildir/new/
After it send email from osradar user to external domain (seoinbahawalpur.com)
echo "External test email" | mailx -s "Test email Postfix MailServer" -r [email protected] [email protected]
Checking Postfix Mail Queue
Run the below command to list mails which are in queue
mailq

See the log file by
tail -f /var/log/maillog
So, that’s how we can Install & Configure Postfix Mail Server on our CentOS Operating System.
