

Hello! Have you heard about virtual machines? Do you know what virtualization is? Did you know that Windows 11 has its own virtualization approach already included? Well, we will try to answer those questions in this post. Just so we understand, Hyper-V is Microsoft’s internal virtualization solution for Windows 11. Thanks to this tool, we will be able to create virtual machines and run them on virtual hardware. It was first introduced in Windows Server 2008. In fact, the definitive version was released in June of the same year. With the launch of Windows 8 it reached all users. We also saw it in later versions such as Windows 8.1, Windows 10 or Windows 11. Let us see how we can take advantage of it and how we can enable Hyper-V. In addition to how to create virtual machines without using third-party tools.
What is a Virtual Machine
A virtual machine is a software that creates an independent layer where the operation of a real computer is emulated. Additionally, it includes all the hardware components you need to run a different operating system or a specific application. It can be run in a window as a separate computing environment. A virtual machine works like a computer within a computer. Also, it and allows end-users to use apps as they would on an actual machine. It is an excellent tool for programmers, developers and IT professionals. Indeed, this environment allows you to create, deploy and manage applications and software securely.

What is Hyper-V
Hyper-V is a hardware virtualization product from Microsoft that allows users to create, run and manage virtual machines on a host operating system. In addition, Hyper-V provides hardware virtualization. As a result, each virtual machine runs on virtual hardware. It also allows multiple operating systems to be created and run on a single physical machine. In addition, Hyper-V also allows users to perform system administration tasks such as backup, restore, and migration of virtual machines.

What are the requirements for using Hyper-V?
The first thing to know is that Hyper-V is available as an optional feature in Windows 11 Pro, Enterprise, and Education. If you don’t know what version of Windows you have, you can find out by going to Settings>System>About. Then check the Windows specifications section to find your edition of Windows. But we must not only have a compatible Windows. In fact, we must also enable hardware virtualization in BIOS. This function is usually disabled. Therefore, we must be the ones to enable it.
When should we use Hyper-V?
There are some cases in which we could use Hyper-V. In this way, not having to rely on another third-party tool such as VirtualBox or VMware Workstation.
- Run and test an older version of Windows or a non-Microsoft signature operating system.
- Test software on multiple operating systems using many virtual machines on a single host system.
Enabling hardware virtualization in BIOS
As we have told you before, for everything to work perfectly, the hardware virtualization part of the BIOS must be operational and enabled. To perform this task, you should consult the user manual. Indeed, each brand uses a different way to enable this function. For knowledge purposes, let’s assume you have a computer from a well-known brand, such as HP.
- Turn off the computer.
- Now we turn on the system and start pressing the Esc key to see the boot menu.
- It is time to press F10 to enter the BIOS Setup.
- In the BIOS Setup Utility, we use the arrow key and open the Setup tab.
- Next, we go down to the Virtualization Technology option.
- Press Enter and then click on Enable.
- Press the F10 key to save the changes and exit.
- The computer will restart, and the virtualization tool will be enabled.
Hyper-V on Windows: control panel
Now it is the turn of Windows 11 and the ways that we have to enable the Hyper-V. The first one is by using the Windows Control Panel as follows:
- Press Win + R to open the Run dialog.
- Type Control Panel and open the option that pops up.
- Now go to Programs>Programs and Features.
- In the left pane, we click to Turn Windows features on or off.
- Now, in the Windows Features dialog box, we select Hyper-V.
- We must make sure that when we expand this option, Hyper-V Management Tools and Hyper-V Platform come up as active.
- Then we click on OK.
- As these are optional features, Windows will begin to install and enable them on the computer. This process may take some time to complete.
- When it is finished, click on Restart Now.

Hyper-V on Windows: Command Prompt
Another way to perform this same action is to use the Command Prompt. DISM is used to get Hyper-V running on the computer.
- We write cmd in the task bar and when the option appears we click on Run as Administrator.
- Now that we are inside the Command Prompt, we write the following: DISM /Online /Enable-Feature /All /FeatureName:Microsoft-Hyper-V
- Once we press Enter, it will start enabling the Hyper-V feature, and we will see the progress on the screen.
- Once the operation completes successfully, you will need to reboot your PC. Then, press Y on your keyboard to confirm the action.

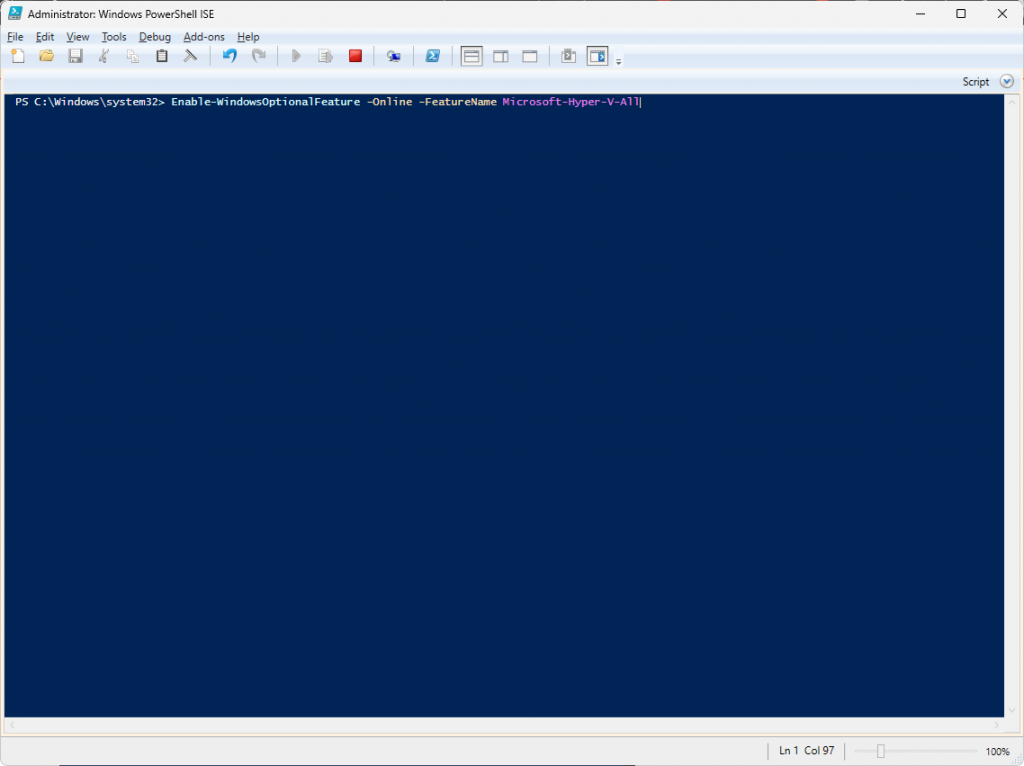
Hyper-V on Windows: Windows PowerShell
It is certainly a simple process with the command prompt. On the other hand, with Windows PowerShell it will be equally easy.
- In the search box of the taskbar, we write PowerShell, and we give to Run as administrator as soon as it comes out.
- Already in PowerShell, we write the following command, and we press Enter: Enable-WindowsOptionalFeature -Online -FeatureName Microsoft-Hyper-V-All
- PowerShell will start the Hyper-V enablement process. If successful, we will be prompted to restart the PC.
These are the ways we have to enable Hyper-V in Microsoft’s operating system. As you have seen, it is very simple, surely much more than you expected, to have Hyper-V fully operational in Windows 11. This way you can enjoy the benefits of virtualization on your computer. With the added bonus of not having to purchase or download additional software. See you soon!
