

Hello! Those who manage Windows 10 usually perform various management and support tasks. Indeed, this work is to optimize the performance and stability of the computer. However, sometimes we cannot be physically in front of the computer. Therefore, it is difficult for us to perform any action. Fortunately, Windows 10 has an option to make our life easier. We are talking about the task scheduler. This tool allows you to easily schedule actions on your computer. Let’s see how to configure the task scheduler in Windows 10.
What is the task scheduler?
This is a Microsoft tool included by default in Windows systems. It is actually an MMC add-in. That is, Microsoft Management Console. Its main function is to allow creating automated tasks at a certain time, or when an event occurs. It also includes a library of all the tasks that have been scheduled. Therefore, we will have an organized view to have a centralized control of the actions to be performed. In short, it helps to relieve the administrative burden.

What is Windows Task Scheduler
There are two key concepts in the task scheduler:
Triggers
A trigger allows a task to be executed as scheduled. Let’s take a look at some of them:
- When logging in
- When an event occurs
- On system startup
- When locking the computer
- When creating or editing a task
Action
It is the task is the work that is performed when the task is executed. Some of the actions that we can configure in Windows 10 are:
- Display a message
- Execute a program
- Send an e-mail
How to open Windows 10 Task Scheduler
There are several methods for doing this.
How to open Task Scheduler with search
This modality will be done from the Windows search engine. With this in mind, press the Win+Q combination or simply click on the search button. In either case, just type the word Scheduler. Finally, click on Task Scheduler.

How to open Task Scheduler with Run box
With this intention, press the Win+R combination. Once there, please run the following command:
taskschd.msc

How to open the task scheduler with Control Panel
The task scheduler can be accessed from the Control Panel. With this in mind, open the Control Panel and then click on System and Security.

In the next window, locate the Administrative Tools option. Once there, click on Schedule Tasks.

In the list, please click on Task Scheduler.

Open Task Scheduler with computer management
From the computer management, we can control several elements. In the same way, we can access the task scheduler. With this in mind, press the Win+X combination or right-click on the Start menu. Now click on Computer Management.

After Computer Management is displayed, just click on Task Scheduler.

How to open the task scheduler with CMD
If you like to use the command line, then this option is for you. Please type CMD in the search box to launch the Command Prompt.

Then run the following command:
taskschd.msc

How to open Task Scheduler with PowerShell
We can also open it with PowerShell. To accomplish this, right-click on the start menu. Then select the corresponding option.

Once again, run the following command:
taskschd.msc

How to use Windows 10 Task Scheduler
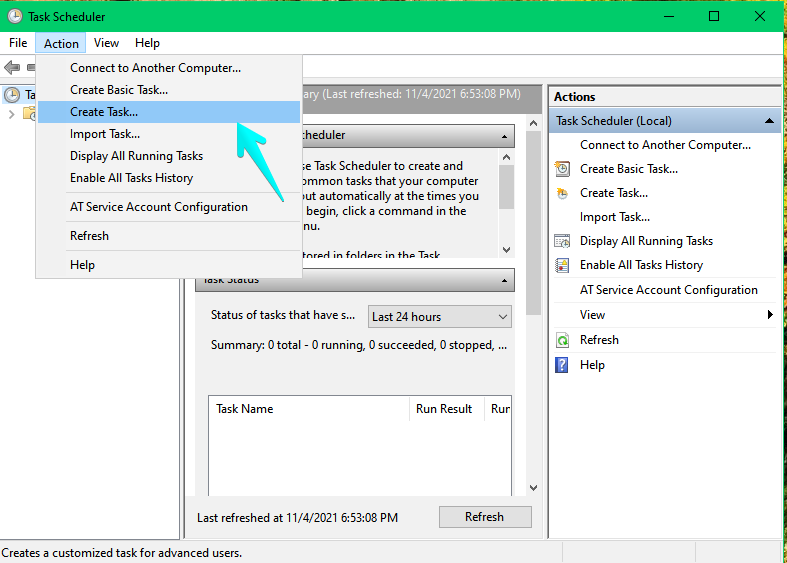
Let’s see how to use the Windows 10 task scheduler. The first thing you have to do is to open the task scheduler. To complete this, follow any of the methods mentioned above. Next, from the Action menu, choose Create Task or Create Basic Task.
In the new tab, we have to manage some elements. In the General tab, we will set the name of the task and the security options. For example, that this task is only run when you are logged in.

Next, click on the Triggers tab. Then, select the New option. This will open a new window. Once there, please set when the task will be started. For example, when logging in, when idle, when an event occurs, etc.


It is also necessary to define how often the task will be performed. I.e., daily, weekly, etc. It is also possible to add some other parameters. After pressing OK, you will see the task actually created.

Now, you have to click on the Actions tab. In the same way, select the New option. Now you have to define which function the task scheduler should execute at the specified time. It can be starting a program, sending an email, etc. This time, we will choose to open a program.

When you press OK, you will see the action added.

In the Conditions tab, you define the variables that condition the execution of the rule. They are mostly referred to energy, activity and connectivity conditions.

Finally, in the Settings tab, additional values are defined for the fulfillment of the task.

Customizing the rule
After configuring all the values, you will see the rule created and ready to execute. You only have to look for it inside the library. Now, from the panel located on the right side, you can run the rule. Also in this panel, you can delete it, stop it or export it for use on another computer.

Task scheduler options.
Windows 10 has introduced some variants in the task scheduler. Let’s take a look at some of them.
Stop the task scheduler
The goal is to reduce battery usage and avoid background processes. To stop it, you must launch the Task Manager. With this in mind, press the combination Ctrl+Shift+Esc. Once there, click on the Processes tab. Now scroll down to the bottom until you get to the Service Hosts. When you get to the Task Scheduler, please right-click on it and finally click on Stop.

Display a summary of scheduled tasks
As mentioned at the beginning, this tool displays a library of available scheduled tasks. To see this list, just click on Task Scheduler Library. From there it is possible to manage all tasks. That is, start them, delete them or export them. Just use the menu in the right column.

At the end of the day, we have seen how to configure task scheduler in Windows 10. A very practical tool that helps to lighten the administrative burden on the teams we manage. Bye!
